Monthly Archives: April 2023

National Oatmeal Cookie Day

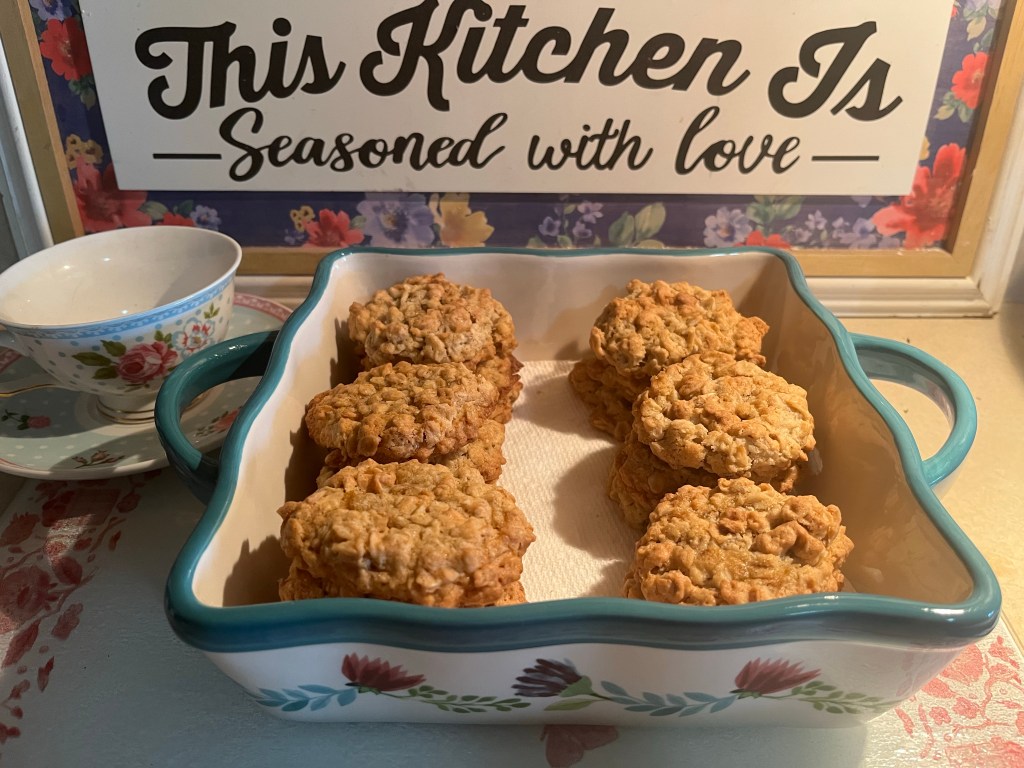
It’s National Oatmeal Cookie Day! Fannie Farmer wrote the first recipe for oatmeal raisin cookies in 1896. The cookies soon became incredibly popular because they were a healthier alternative to other baked goods.

Quaker Oats started putting their oatmeal raisin cookie recipe on their oatmeal containers as early as 1900. The Quaker Oats Oatmeal Cookie recipe is my personal favorite and the only one that I’ve used throughout the years. I’ve tried several others but there is nothing compared to the original Quaker Oats recipe for Oatmeal Cookies.

For Quaker’s Oatmeal Raisin Cookie recipe click here.

Quaker Oats Oatmeal Cookie Recipe

Ingredients

3/4 Cup(s) firmly packed brown sugar

3/4 Cup(s) trans-fat free vegetable shortening

1/2 Cup(s) granulated sugar

1/4 Cup(s) Water

1 Teaspoon(s) vanilla

3 Cup(s) Quaker® Oats (quick or old fashioned, uncooked)

1 Cup(s) all-purpose flour

1 Teaspoon(s) salt (optional)

1/2 Teaspoon(s) Baking Soda

1 Egg(S)

Directions

Heat oven to 375°F. In large bowl, beat brown sugar, shortening and granulated sugar on medium speed of electric mixer until creamy.

Add egg, water and vanilla; beat well. Add combined oats, flour, salt and baking soda; mix well.

Drop dough by rounded teaspoonfuls onto ungreased cookie sheets.

Bake 9 to 11 minutes or until edges are golden brown. Remove to wire rack. Cool completely. Store tightly covered.

Pat Nixon’s Meatloaf (President Nixon’s Favorite!)

Everyone has their own personal spin and touches on how to make a meatloaf. My stepmom used to sauté the onions+ green peppers and add in those delicious bread crumbs and seasonings and always ketchup on the top. My mom? Well…she tried to make MeatLoaf. Once. I’ll never forget how it was so terrible that my stepdad vowed from then on HE would be the Meatloaf maker (thank God!)

I’ve always done my own thing with Meatloaf too. Onions. Salt and Pepper. I use crunched up crackers in the mix (whatever buttered crackers I have in hand) and two eggs. I leave out the green peppers because my husband doesn’t care for them. Ketchup on top. Easy Peasy.

It was interesting to read Mrs Nixon’s personal recipe for Meatloaf. She used Thyme, Marjoram and S&P for her spices. As well as chopped parsley. The recipe even called for breadcrumbs on the top. It was totally different than what I’ve ever made but I thought I would give it a go. My husband was hesitant at first and a little unsure of how this different concoction would taste. But he loved it 👍 He even said that it’s the BEST meatloaf that I’ve ever made. Wow!

Meatloaf was absolutely President Nixon’s favorite food. He also enjoyed cottage cheese + ketchup for breakfast (but that’s another story!) So it’s an honor to have this recipe and eat something that President Nixon once enjoyed. It’s really special too being that it’s Mrs Nixon’s personal family recipe.

Former first lady Pat Nixon’s meatloaf recipe appeared years ago in the Pittsburgh Post-Gazette. In the article, it states, “This recipe for family-style meatloaf is from the Nixon administration and belonged to first lady Pat Nixon. It was so popular that the recipe was printed on White House stationery to be mailed on request.”

Here’s the recipe…make it and eat like a President tonight 🇺🇸

Pat Nixon’s Meatloaf

Ingredients needed to make Pat Nixon’s MeatLoaf

Ingredients

2 tablespoons butter
1 cup finely chopped onions
2 garlic cloves, minced (I used minced garlic)
3 slices white bead
1 cup milk
2 pounds lean ground beef
2 eggs, lightly beaten
1 teaspoon salt
Ground black pepper, to taste
1 tablespoon chopped fresh parsley
1/2 teaspoon dried thyme
1/2 teaspoon dried marjoram
2 tablespoons tomato puree (I used tomato sauce)
2 tablespoons bread crumbs

Directions

Grease a 13-by-9-inch baking pan. Melt butter in a saute pan, add garlic and saute until just golden — do not brown. Let cool.

In a small bowl, cube the bread and soak it in the milk.

Sauté the onions

In a large mixing bowl, mix ground beef by hand with sauteed onions and garlic and bread pieces.

Add eggs, salt, pepper, parsley, thyme and marjoram and mix by hand in a circular motion.

Turn this mixture into the prepared baking pan and pat into a loaf shape, leaving at least one inch of space around the edges to allow fat to run off. Brush the top with the tomato puree and sprinkle with bread crumbs.

Refrigerate for 1 hour to allow the flavors to penetrate and to firm up the loaf.

Preheat the oven to 375 degrees. Bake meatloaf on lower shelf of oven for 1 hour, or until meat is cooked through. Pour off accumulated fat several times while baking and after meat is fully cooked. Let stand on wire rack for five minutes before slicing. Makes 6 servings.

Pat Nixon’s Meatloaf w/homemade mashed potatoes and corn 🌽

Click here for the full recipe and for more information about Mrs Nixon’s Meatloaf.

Rainbow Fruit Salad w/Honey Lime Dressing

I’ve been doing some research on how to eat healthier and to get more fruit + vegetables in my daily diet. It would be nice to be able to live off of donuts and cake for the rest of my life but let’s face it – that’s not the real world unfortunately.

This fruit salad is packed with all of the delicious nutrients that you need plus it’s so incredibly delicious. Especially with the Honey Lime Dressing! It’s so easy to make and you can really use any type of fruit available to make it your own – although watermelon isn’t recommended due to its potential to soak up the dressing.

Rainbow Fruit Salad with Honey Lime Dressing

The fruit we used for the fruit salad
What you’ll need for the honey lime dressing

Ingredients

1 pound fresh strawberries (hulled and quartered)

1 can (15oz) of diced pineapple (drain the juice!)

12 oz of fresh blueberries

12 oz seedless red grapes, halved

1 can (15oz) mandarin oranges (drain the juice!)

2 ripe bananas, sliced

Honey Lime Dressing

1/4 cup honey

1 tablespoon lime juice

Directions

In a large bowl, combine all of the fruit.

In a small bowl, whisk together the honey and lime juice. Drizzle over the fruit right before serving.

Gently toss the fruit to coat evenly.

Rainbow Fruit Salad w/Honey Lime Dressing

I adapted the recipe from I am Homesteader. Make sure to check out their site with thousands of delicious recipes!

Apees Cookies – President James Buchanan’s Favorite Cookie

Today in American history…James Buchanan was born on April 23, 1791 in Cove Gap, Pennsylvania. He was our fifteenth U.S. President – serving from March 4, 1857 to March 4, 1861.

President James Buchanan (Matthew Brady Photo)

An article from the Daily Democrat and News published on 20 December 1859 pretty much summed up a “day in the life” of President Buchanan:

“If Mr. Buchanan does not enjoy his politics; he is in full enjoyment of his usual robust health. He rises early, reads the newspapers, breakfasts, transacts business, takes a walk, dines plainly, receives visitors, and goes to bed at ten o’clock” (Daily Democrat and News, 20 December 1859, page 2: column 3, Chronicling America, LOC).

For dinner, he may have eaten his favorite sauerkraut and pork along with the cookies he enjoyed the most for dessert: Apees.

I have never heard of this cookie so, of course, had to do a little bit of research. Apees were a spiced butter cookie of German origins that were very popular in Philadelphia and the Pennsylvania Dutch country. They used to be be made with spices but later on, because of the cost and the hassle of being imported, they later turned into somewhat of a butter cookie.

For the history of the cookie and the original recipe from 1828 click here.

Here’s the modern recipe that I used in the kitchen today:

Ingredients

1 cup butter (2 sticks)

1 cup of granulated sugar

1 egg

1/2 cup of sour cream

2 c all-purpose flour

Directions

Cream together the butter and sugar till the mixture is light and fluffy. Beat in the egg. Fold in the sour cream.

Stir in the flour a little at a time, beating until the mixture is well blended.

Wrap the dough and chill thoroughly. I refrigerated the dough overnight.

Roll the dough on a lightly floured surface to 3/8 an inch thickness.

Cut with a floured 2 inch round cutter.

Place rounds on an ungreased baking sheet.

Bake in a preheated oven of 350 degrees until the edges are a golden brown – about 10-12 minutes.

Remove from the oven and cool.

The cookies are delicious plain but I prefer to add buttercream icing – which makes them even more delicious!

Apees Cookies

Lucretia Garfield’s Potato Bread

Today in American history…former First Lady Lucretia Garfield was born in Garrettsville, Ohio on April 19, 1832. She married future President James Garfield on November 11, 1858.

This photo was taken around the time of James and Lucretia Garfield’s engagement (Western Reserve Historical Society)

Mrs Garfield became First Lady when her husband became our 20th US President on March 4, 1881 until his untimely death on September 19, 1881 (President Garfield was shot on July 2, 1881 and succumbed to his injuries).

Photo by Matthew Brady

In her short time as First Lady, she was known for her cheerful social events at The White House. She even lifted the ban on alcoholic beverages that were banned by her predecessor, Lucy “Lemonade” Hayes. Mrs Hayes was not a fan of having alcohol during social events at The White House and banned them. Hence the press and the public gave her the nickname of Lucy “Lemonade” Hayes.

Lucretia Garfield was interested in researching the history of The White House as well as the history of the previous First Ladies. She also began to inventory the historic objects contained in The White House – similar to Jacqueline Kennedy’s project when she was the First Lady in 1961-1963.

President Garfield’s favorite foods were squirrel stew, fresh baked bread, mashed potatoes, parsnips and apple pie. He also enjoyed milk.

His ultimate favorite food was potato bread.

Mrs Garfield had a collection of several recipes – including her potato bread. I thought about making a few things today to honor her birthday and potato bread was the win. Squirrel Stew??! Not so much!

Lucretia Garfield’s Potato Bread fresh out of the oven with butter 😋

Lucretia Garfield’s Potato Bread

Ingredients

1 large russet or log white potato

1/4 cup butter, cut up

1 1/2 teaspoon salt

4 1/4-4 3/4 cups all purpose flour

2 packages active dry yeast

2 eggs

2 cups water

Directions

Peel and cube potato. In saucepan, combine potato and the water. Bring to boiling. Cook, covered, for 12 to 15 minutes or until very tender. Drain, reserving 1 cup of hot cooking liquid. Set liquid aside. Mash potato cubes with a potato masher (should have 1 cup). Set aside.

Combine reserved cooking liquid, butter and salt. Cool to 120 degree F to 130 degree F.

In a large bowl, combine 2 cups of the 4-1/4 cups flour and the yeast. Add reserved cooking liquid and eggs. Beat with electric mixer on low speed for 30 seconds, scraping side of bowl. Beat on high speed for 3 minutes. Using a spoon, stir in mashed potatoes and as much of the remaining flour as you can.

On a lightly floured surface, knead in as much of the remaining flour as you can to make a moderately stiff dough that’s smooth and elastic (6 to 8 minutes total). Shape into a ball. Place in a greased bowl; turn once to grease surface. Cover; let rise in a warm place until doubled (1 to 1-1/2 hours).

Punch dough down. Turn out onto lightly floured surface. Divide in half. Cover and let rest for 10 minutes.

Shape into loaves or rolls. For loaves, shape each half of dough into a loaf. Lightly dip tops of loaves into additional flour. Place loaves, floured sides up, in 2 greased 8x4x2-inch loaf pans. For rolls, divide each half of dough into 12 pieces. Shape into balls. Lightly dip tops into flour. Place on greased baking sheets. Cover bread or rolls. Let rise until nearly doubled (30 to 40 minutes).

Bake in a 375 degree F oven. For loaves, bake for 35 to 40 minutes or until bread sounds hollow when tapped (if necessary, cover with foil during the last 15 minutes to prevent overbrowning). For rolls, bake for 20 to 25 minutes or until golden. Remove from pans; cool on a wire rack. Makes 2 loaves or 24 rolls.

(Recipe from Midwest Living)

My Favorite Stuffed Peppers

I’m kind of like an old school type sometimes when it comes to cooking. A dash of this…a dash of that…a sprinkle of this…a handful of that. Some have asked for my homemade macaroni & cheese recipe and especially my homemade lasagna. I truly don’t have one and just do it “my way.”

This is the same for my Stuffed Peppers.

But I will share with YOU since I carefully documented tonight on how I made them.

Everything you will need to make Stuffed Peppers

Ingredients

1.5 lbs Ground Beef

1 can (14 or 15 oz) Tomato Sauce

1 Onion, chopped and diced

4 Bell Peppers (any color is fine)

2 Packets of Instant Boil-in-Bag Brown Rice (although any type of rice will work – another favorite of mine is Jasmine Rice)

4 ounces of Feta Cheese (Mozzarella is delicious too!)

1 tsp Oregano

1 tsp Rosemary

Dash of Salt & Pepper

Chopped Basil (for garnish)

Directions

Preheat your oven to 375 degrees.

Cut/remove the tops off of the peppers and core them. Make sure there aren’t any seeds left inside! Set the peppers aside.

Cook the rice according to package instructions.

Cook ground beef and onion in a a skillet until done and no longer pink.

Add the tomato sauce, oregano, rosemary, salt and pepper. Once the rice is cooked, add to the ground beef mixture. Mix thoroughly.

Divide filling amongst the peppers. Place the peppers in a baking dish.

Sprinkle Feta Cheese on the top.

Bake for 30 minutes.

Switch your oven over to broil and top the peppers with the remaining cheese. Place under the broiler to melt for about 2-3 minutes.

Remove from the oven.

Garnish with Basil (optional)

Ready to eat. Enjoy!

The Best Egg Salad Sandwich

My husband loves Egg Salad. I feel as if he can eat it a few times a week if he were given a choice. He’s also what I jokingly refer to as a “food snob” in that he is so extremely picky when it comes to egg salad or just about anything. If it excites him…he’s a happy camper. If it doesn’t? He’ll let ya know. He would make a wonderful professional food critic 🤣 I do appreciate his honesty!

When I made egg salad last night, I was little hesitant. He’s had his own personal recipe that he’s used for years and it’s never failed him. I have to tell you though…he absolutely loved this! He even said that it’s “restaurant quality” which to me is a big thumbs up.

Funny behind the scenes story. I’ve cooked and baked for so many years now. Had my own bakery and cafe at one time, too. But for some reason, I always have trouble when it comes to boiling eggs!! Taking the shells off when done too. Ugh. So, thank you to Marlin for not only being my personal food critic and taste tester but also a huge thank you for teaching me the correct way to boil and peel off eggs shells. You are the best ❤️

Here are the ingredients needed for the perfect Egg Salad Sandwich

Ingredients

  • 1 Cup Hellman’s Mayonnaise
  • 1 Tablespoon Dijon Mustard, or Yellow
  • 1-2 Tablespoons Stoneground Mustard
  • 1/4 Teaspoon White Vinegar, or Lemon Juice
  • 2 Tablespoons Chives, minced fine
  • 2 Teaspoons Fresh Parsley, chopped
  • 1 Teaspoon Fresh Dill Weed, chopped or 1/2 Teaspoon Dried
  • 1/2 Teaspoon Kosher Salt
  • Pepper, fresh ground to taste
  • 8-10 Hard Boiled Eggs, chopped
  • 7 Grain Bread, Pumpernickle, white, etc all work
  • Green Leaf Lettuce

Directions

In a small bowl, combine all ingredients for the sauce.

Combine the chopped eggs and sauce.

Place in the fridge to chill for a couple of minutes or up to 1 day.

Toast bread in a pan with a little butter if desired or serve plain.

Place some egg salad on each piece of bread and a leaf of lettuce.

I used the recipe from Oh Sweet Basil and you can find many more delicious recipes on their website.

Caprese Orzo Pasta

Caprese Orzo Pasta is the perfect dish for Spring. It has all of my favorite ingredients as in Mozzarella, tomatoes, Italian seasonings and it’s so easy to make!

Ingredients

Everything you need to make for Caprese Orzo Pasta
  • 1 1/2 Cups Orzo Pasta
  • 1 Tablespoon Olive oil
  • 2 Cloves Garlic, minced
  • 3 Cups Chicken Broth
  • 1 teaspoon Thyme leaves, fresh
  • 1/4 Cup Basil, Fresh, chopped
  • 1 Cup Mozzarella, buffalo, or mozzarella pearls
  • 1 Cup Tomatoes
  • 2/3 Cup Parmesan Cheese, grated, plus more for garnish
  • Cracked Pepper, fresh, to taste
  • Salt, to taste

Directions

In a skillet over medium heat, add the olive oil and pasta.

Cook, stirring occasionally until toasted, about 30-60 seconds.

Add garlic and stir it in followed by thyme.

Add the broth, a small amount at a time.

Bring to a boil, cover the skillet with a lid and turn down to a simmer for 8-10 minutes or until the pasta has absorbed most of the water and is tender.

Add the cheeses, tomatoes, basil and salt and pepper to taste and serve immediately.

I used the recipe from Oh Sweet Basil. Make sure to check out more recipes on their site!

Today in American History…Thomas Jefferson was Born in 1743 🇺🇸

Today in American History…Thomas Jefferson was born on April 13, 1743 at the family’s Shadwell Plantation in Virginia (in 1743, Virginia was known as the British Colony of Virginia)

In 1761, at the age of sixteen, he entered the College of William & Mary in Williamsburg, Virginia and studied mathematics, metaphysics, and philosophy. He later wrote of his time at William & Mary that he “heard more common good sense, more rational & philosophical conversations than in all the rest of my life.”

Thomas Jefferson was an avid reader and treasured books. He actually amassed three libraries in his lifetime. He organized his wide variety of books into three broad categories corresponding with elements of the human mind: memory, reason, and imagination. After the British burned the Library of Congress, he sold this second library to the U.S. government to help starry the Library of Congress collection. Never one to stop collecting books, he soon resumed collecting for his own personal library. He once wrote to John Adams, “I cannot live without books.”

By the time of his death on July 4, 1826, his personal collection of books amassed to about 2000 volumes – many still available to see at his Monticello home.

Thomas Jefferson was famous for many things and some of the highlights of his life were:

• Credited with being the author of the Declaration of Independence.

• Member of the Virginia House of Burgesses, May 11, 1769 – June 1, 1775

• Delegate from Virginia to the Continental Congress, June 20, 1775 – September 26, 1776

• Second Governor of Virginia, June 1, 1779 – June 3, 1781

• Delegate from Virginia to the Congress of the Confederation, November 3, 1783 – May 7, 1784

• Minister Plenipotentiary for Negotiating Treaties of Amity and Commerce, May 12, 1784 – May 11, 1786

• Second United States Minister to France, May 17, 1785 – September 26, 1789

• First United States Secretary of State, March 22, 1790 – December 31, 1793

• Second Vice President of the United States, March 4, 1797 – March 4, 1801

• Third President of the United States, March 4, 1801 – March 4, 1809

In 1819, Thomas Jefferson founded The University of Virginia which was one of his own personal greatest accomplishments.

On his epitaph that he personally wrote, where he rests eternally at Monticello, it is written:

HERE WAS BURIED THOMAS JEFFERSON, AUTHOR OF THE DECLARATION OF AMERICAN INDEPENDENCE, OF THE STATUTE OF VIRGINIA FOR RELIGIOUS FREEDOM, AND FATHER OF THE UNIVERSITY OF VIRGINIA.

Cucumber, Tomato & Onion w/Red Wine Vinaigrette

This is perfect for cookouts, potluck gatherings or really just to eat at home because it’s one of Marlin’s favorites 🥰

It reminds me of the essence of Summer and being by the pool. Smelling burgers being cooked on the grille. Ok I’m getting a little excited about Summer coming, can ya tell??!!

It’s such an easy recipe to make especially if you are in a hurry. I’m also going to share with you my personal favorite recipe for Red Wine Vinaigrette salad dressing to go with it which I know you’ll just wanna drink by itself – it’s THAT delicious!

Cucumber, Tomato & Onion w/Red Wine Vinaigrette

What you’ll need to make Cucumber, Tomato & Onion w/Red Wine Vinaigrette

Ingredients

1 Large Cucumber, thinly sliced (I used the seedless, much easier!)

4-5 Tomatoes, thinly sliced

1 Large Onion, thinly sliced

1/2 Cup extra-virgin olive oil

3 tablespoons vinegar of choice (balsamic vinegar, red wine vinegar, white wine vinegar. I used red wine vinegar)

1 tablespoon Dijon mustard

1 tablespoon maple syrup or honey (I used honey)

2 medium cloves garlic, pressed or minced (I omitted the garlic – still tastes delicious!)

1/4 teaspoon fine sea salt, to taste

Freshly ground black pepper, to taste

Directions

In a liquid measuring cup or bowl, combine all of the ingredients (minus the cucumber, tomato’s and onion) Stir well with a small whisk or a fork until the ingredients are completely mixed together.

Taste, and adjust as necessary. If the mixture is too acidic, thin it out with a bit more olive oil or balance the flavors with a little more maple syrup or honey. If the mixture is a little blah, add another pinch or two of salt. If it doesn’t have enough zing, add vinegar by the teaspoon.

In a separate bowl, add the sliced cucumber, tomatoes and onion. Pour the vinaigrette over and mix thoroughly.

Cover and refrigerate until ready to use.

For the vinaigrette, immediately use or cover and refrigerate for the future. Homemade vinaigrette keeps well for 7 to 10 days. If your vinaigrette solidifies somewhat in the fridge, don’t worry about it—real olive oil tends to do that. Simply let it rest at room temperature for 5 to 10 minutes or microwave very briefly (about 20 seconds) to liquify the olive oil again. Whisk to blend and serve.

I used the recipe from Cookie + Kate. Make sure to look at her website for more delicious recipes!