Remembering those who made the ultimate sacrifice for our country and for our freedom. We are forever grateful and will never forget you. #MemorialDay
“Greater love has no one than this: to lay down one’s life for one’s friends.”
John 15:13

Remembering those who made the ultimate sacrifice for our country and for our freedom. We are forever grateful and will never forget you. #MemorialDay
“Greater love has no one than this: to lay down one’s life for one’s friends.”
John 15:13

Ingredients

1 (14.75-oz.) can salmon, drained
1 tbsp. dill weed
1/2 c. panko breadcrumbs
1/4 c. mayonnaise
1 tbsp lemon juice
1 tbsp. Dijon mustard
1 large egg, beaten
A dash of salt & pepper for seasoning
2 tbsp. extra-virgin olive oil, plus more as needed for frying
Directions
In a large bowl, add first 8 ingredients.
Season with salt and pepper and mix until well blended.
Form into 5, evenly-sized patties.
In a large skillet over medium heat, heat oil. Cook patties until golden and crispy, about 3-4 minutes on each side.
Drain on paper towels.
Serve immediately.
You can serve over a bed of fresh spinach and squeeze a lemon over if desired. I made steamed asparagus as a side dish for ours.
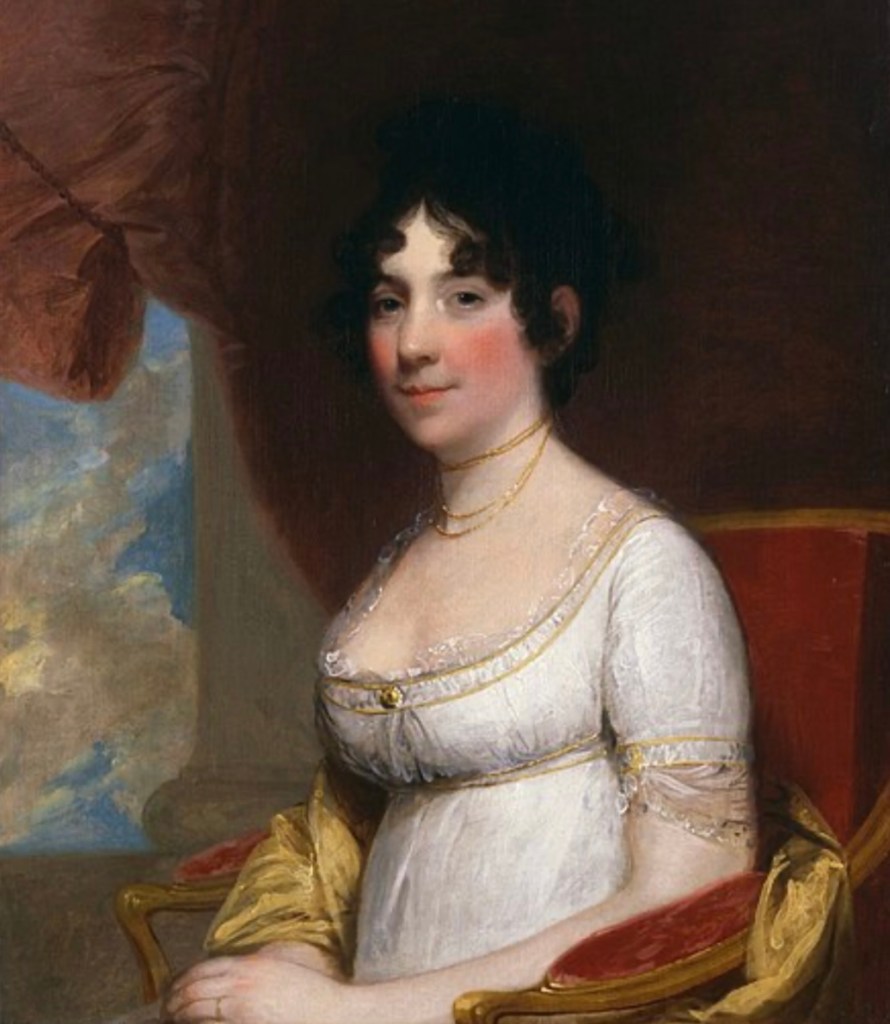
Today in American history…Dolley Madison was born on May 20, 1768 in New Garden, North Carolina (present day Greensboro, North Carolina).
She married James Madison on September 15, 1794.
She was First Lady from March 4, 1809 to March 4, 1817.
She was a very popular First Lady and hostess and was known for her social graces and hospitality which helped contribute to her husband’s popularity while he was President.
Known for her love of entertaining and afternoon tea, one of the items at her famous tea parties were her Woodbury Cinnamon Tea Cakes.
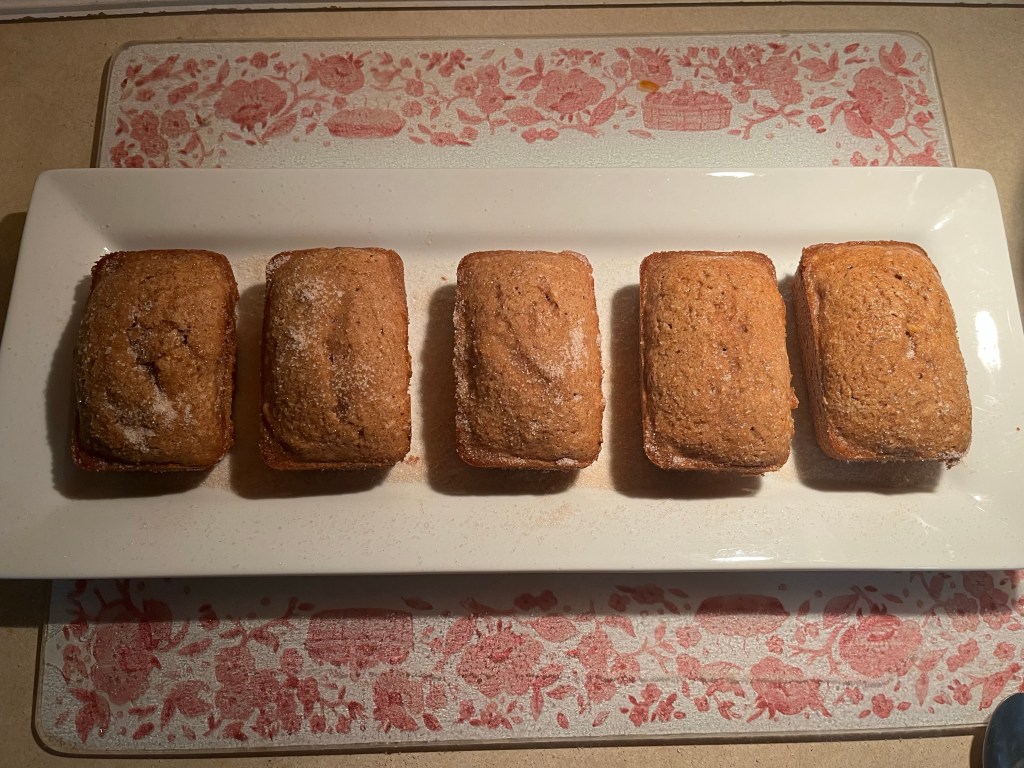
Woodbury Cinnamon Tea Cakes
Ingredients
1 large egg, separated
Pinch of salt
1 cup granulated sugar
1 cup milk
1 tsp vanilla extract
1 cup of flour
2 TBSP melted butter
1 tsp baking powder
1 TBSP ground cinnamon
Directions
Preheat the oven to 350 degrees and grease either a bundt pan or mini bundt pan (I used mini loaf pans). You can also use a square baking pan.
Butter and then flour the pan so the cake will easily come out of the forms after baking.
Beat the egg white with a pinch of salt until still soft peaks form. Gradually add the sugar and continue beating until stiff peaks form.
In a separate bowl, whisk together the milk, egg yolk, and vanilla; slowly fold it into the egg whites.
Fold in the flour, melted butter, baking powder, and cinnamon until just combined.
Pour mixture into prepared baking pan or mini pans.
Bake for 20-25 minutes or until a toothpick inserted in the middle comes out clean. Invert the cake onto a metal rack for cooling.
Immediately, while the cake is still warm from the oven, brush on the additional 2 tablespoons melted butter. Then sprinkle the cinnamon-sugar mixture over the cake.

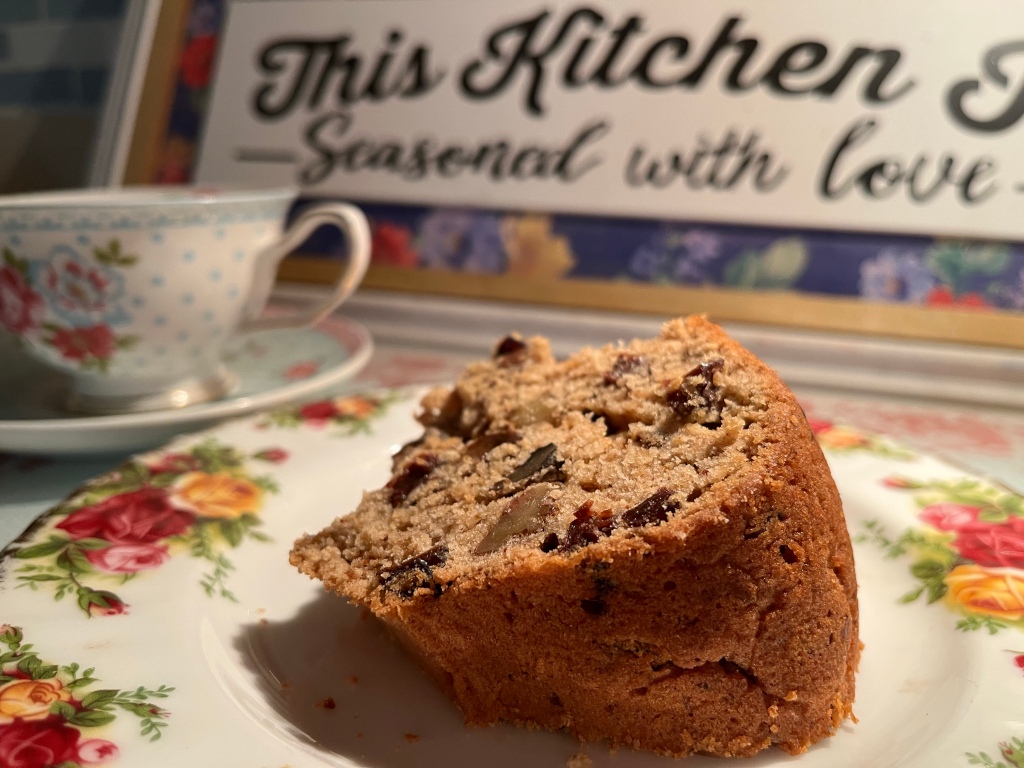
Today in kitchen I made Olivia Walton’s Applesauce Cake.
Some of you may be wondering…who is Olivia Walton? She is a fictional character of the popular classic television show The Walton’s which aired from 1972-1981. Olivia Walton was the matriarch of this beloved family.
The show took place in the Blue Ridge Mountains of Virginia and was about the Walton family and how they survived through the tough times of The Great Depression and World War II.
The show was narrated through the eyes of their eldest son, John Boy Walton, whose only dream in life was to be a novelist.
The show is based on the life of Earl Hamner, Jr (who was the creator of the show) and his family growing up in Schuyler, Virginia.
The Walton’s is my husband’s all time favorite television show – he has seen every single episode and we watch the movie The Homecoming every year at Christmas.
In the fall of 2020, we had the pleasure of visiting Schuyler, Virginia and it was wonderful to see the museum dedicated to The Walton’s television show and strolled through Earl Hamner’s boyhood home – which was based on the television show.

Olivia Walton’s Applesauce Cake Recipe
Ingredients
1 cup butter
1 cup sugar
2 cups unsweetened applesauce
2 cups light raisins
1 cup chopped walnuts
1 tsp baking soda
3-1/2 cups flour (sifted)
2 eggs
1 tsp cinnamon
2 tsp cloves
2 tsp nutmeg pinch of salt
Directions
Sift together: Flour, baking soda, salt, cinnamon, cloves and nutmeg. Take 1/2 cup of flour mixture and stir into the nuts and raisins.
Set both aside.
Cream butter until whipped soft. Add sugar a little at a time until mixture is smooth. Beat in eggs vigorously. Alternately stir in flour mixture and applesauce. When all mixed together, add nuts and raisins and mix well.
Pour batter into a well-greased cake mold (I used a Bundt Pan).
Bake in preheated oven at 350 degrees for one hour.
Cool ten minutes, then turn out on cake rack.
Frost if desired
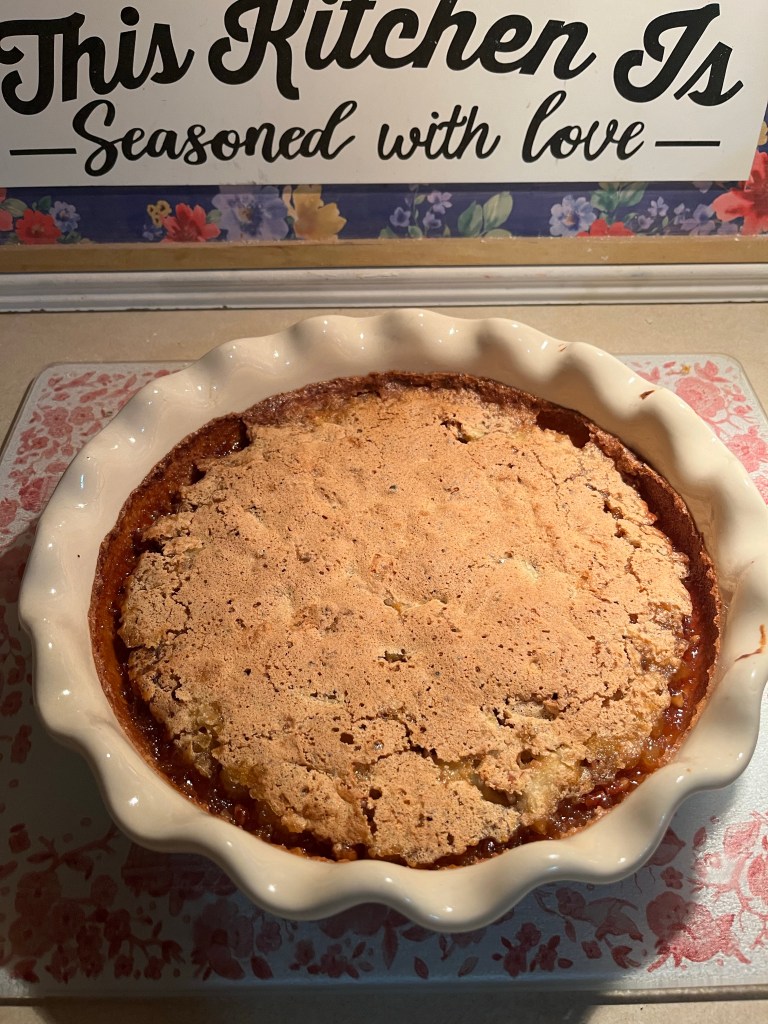
Bess Truman’s Ozark Pudding was one of President Harry S Truman’s favorite desserts. During the Truman Presidency, there were many who wrote letters to The White House asking for the recipe.
Ozark Pudding is kind of a cake-like fruit pudding with pecans. My husband (aka official taste tester) said it tasted like a pecan pie and apple crisp combination. He loved it!
This original recipe is from the Social Correspondence Office Files of the official Truman Papers and was sent to everyone who asked for the recipe.
Ozark Pudding Recipe
1 egg
3/4 cup granulated sugar
2 tablespoons all purpose flour
1 1/4 teaspoons baking powder
1/8 teaspoon salt
1/2 cup chopped nuts (I used pecans)
1/2 cup raw apples (finely chopped, I used granny smith)
1 teaspoon vanilla extract
Directions
Preheat oven to 350°F.
Beat eggs and sugar a long time until very smooth.
Mix flour, baking powder, salt and stir into the sugar-egg mixture.
Fold in apples, nuts, and vanilla.
Bake in a buttered pie pan in preheated oven for 35 minutes.
Cool to room temperature and serve with whipped cream or ice cream.
(Source: Archivist, Harry S. Truman Presidential Library and Museum)
I had leftover blueberries. A few lemons. So I thought…what a perfect combination for a cake! It’s a delicious cake that reminds me of Springtime and the reminder of all things fresh and new on the horizon.
The recipe that I used today is from one of my favorite “go to” sites: Sally’s Baking Addiction. I adapted/tweaked a few things to make it my own but here is the original recipe from Sally’s Baking Addiction.

1 cup (2 sticks) unsalted butter, softened to room temperature
1 and 1/4 cups granulated sugar
1/2 cup packed light brown sugar
4 large eggs
1 tsp vanilla extract
3 cups all-purpose flour
1 TBSP baking powder
1/2 tsp salt
1 cup whole milk
2 TBSP lemon zest
1/2 cup lemon juice (would be about 3 lemons)
1 and 1/2 cups fresh blueberries (frozen will work too!)
Ingredients (for the Lemon Buttercream Frosting)
3 Cups powdered sugar
1/3cups butter or margarine, softened
3 TBSP lemon juice
1/2teaspoon grated lemon peel
Directions (for cake)
Preheat oven to 350 degrees
Grease three 9-inch round cake pans or 8-inch round cake pans (8-inch pans produce thicker cakes), line with parchment paper rounds, then grease the parchment paper.
Using a handheld or stand mixer with a paddle attachment, beat the butter on high until creamy – about 1 minute.

Beat on medium-high speed until creamed, about 2-3 minutes.

Beat on medium speed until everything is completely combined, about 2 full minutes.
Scrape down the sides and bottom of the bowl as needed.
In a large bowl, whisk together the flour, baking powder, and salt.

Beat on low speed for 5 seconds.
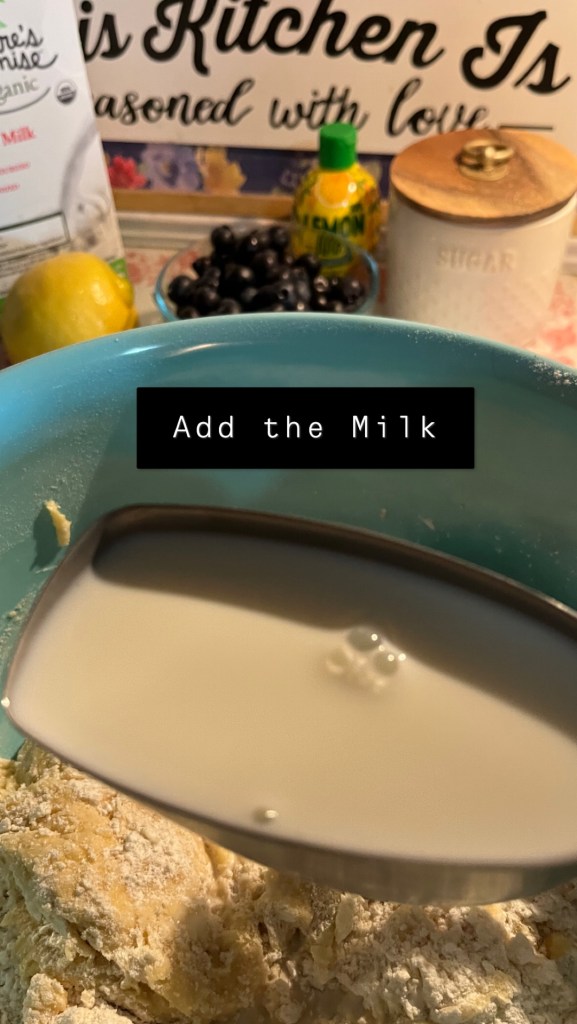


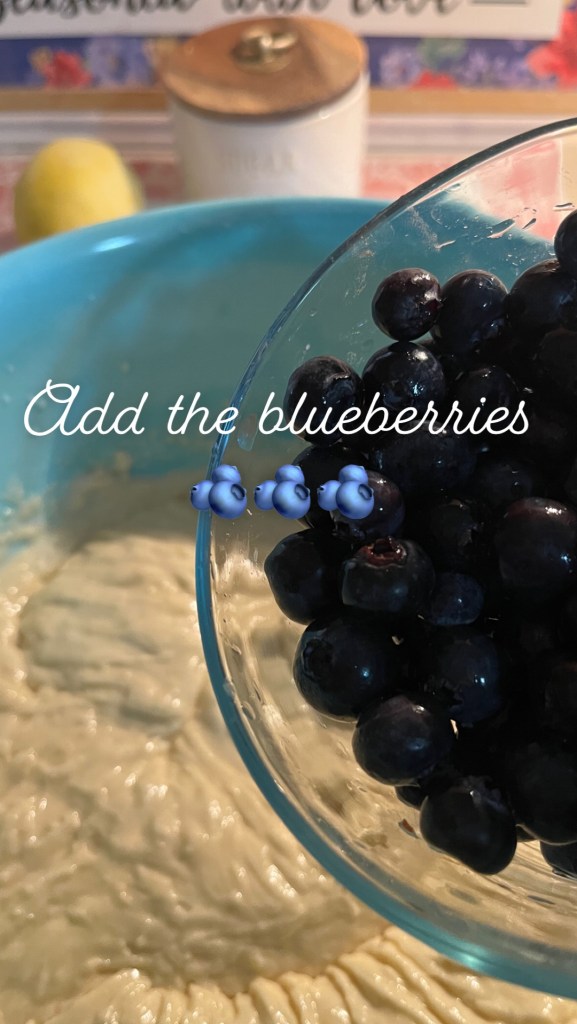
beat in the milk, lemon zest, and lemon juice just barely until combined. Toss the blueberries with 1 Tablespoon of flour and gently fold into the batter. Batter will be very thick.
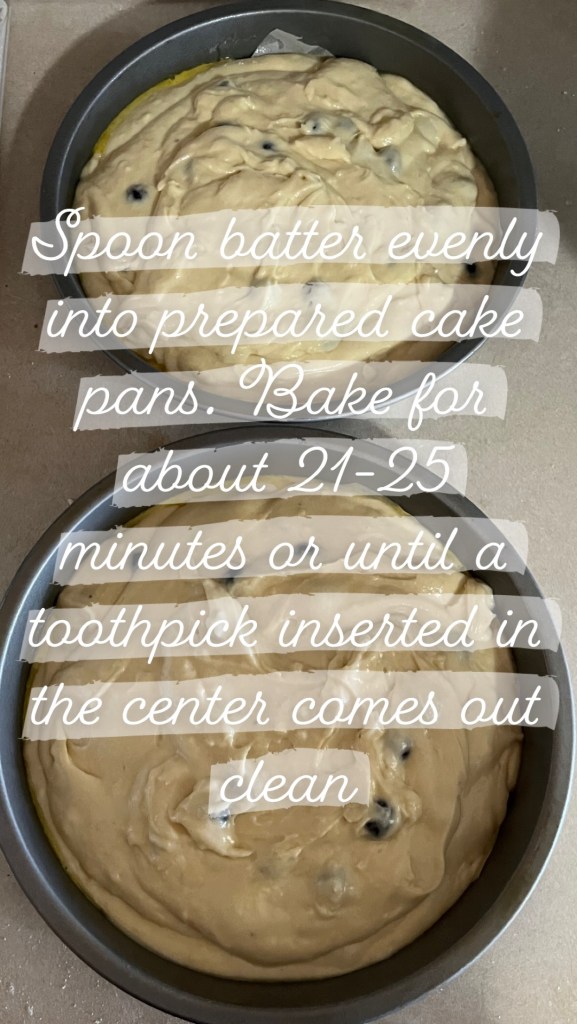
Let the cake cool for about ten minutes then remove from pans onto a baking cooling rack.
Start to make your frosting.
Directions (for Lemon Buttercream Frosting)
Beat butter, lemon peel and lemon juice in medium bowl with electric mixer on medium speed 30 seconds. Gradually beat in powdered sugar. Beat 2 to minutes longer or until light and fluffy.
Once the cake is completely cooled – time to frost. (Hint: Add extra blueberries and lemon zest for garnish!)


I love sweet potatoes in basically every way possible. My favorite? Sweet Potato Pie! Then there’s also…sweet potato muffins…sweet potato chips…sweet potato French fries…sweet potato pancakes…see? I’m a total sweet potato junkie! 🤣
Sweet Potato Cornbread
Ingredients
1 cup of all-purpose flour
1 cup of yellow cornmeal
1 tbsp of baking powder
1/2 tsp of salt
1/4 tsp of baking soda
1/2 cup of cooked and mashed sweet potato
1/4 cup of granulated sugar
1/4 cup of unsalted butter, melted
1 large egg, beaten
1 cup of milk
Directions
Preheat the oven to 400 degrees. Grease a cake pan with cooking spray or butter.
In a large mixing bowl, whisk together the flour, cornmeal, baking powder, salt, and baking soda.
In a separate mixing bowl, mix together the mashed sweet potato, sugar, melted butter, and beaten egg until well combined.
Add the sweet potato mixture to the dry ingredients and mix well.
Slowly pour in the milk, stirring constantly, until a thick batter forms.
Pour the batter into the prepared cake pan and smooth the top with a spatula.
Bake in the preheated oven for 20-25 minutes, or until a toothpick inserted into the center of the cornbread comes out clean.
Let the cornbread cool for 5-10 minutes before cutting and serving.
Serve the sweet potato cornbread warm as a delicious side dish for soups, stews, or chili.
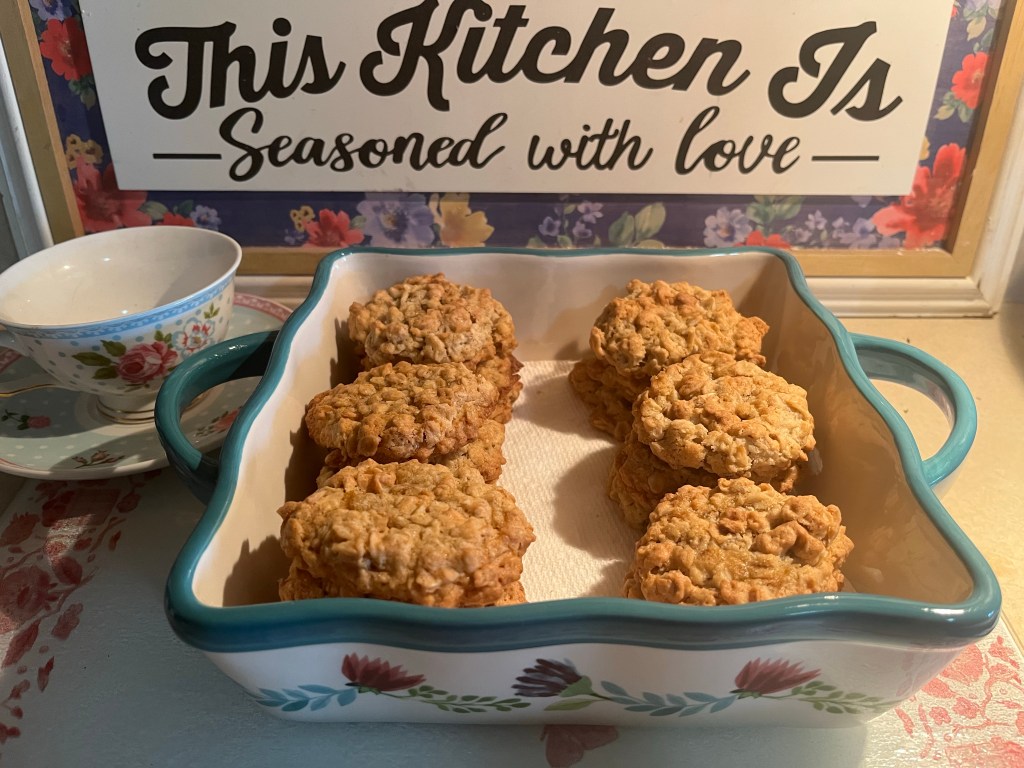
It’s National Oatmeal Cookie Day! Fannie Farmer wrote the first recipe for oatmeal raisin cookies in 1896. The cookies soon became incredibly popular because they were a healthier alternative to other baked goods.
Quaker Oats started putting their oatmeal raisin cookie recipe on their oatmeal containers as early as 1900. The Quaker Oats Oatmeal Cookie recipe is my personal favorite and the only one that I’ve used throughout the years. I’ve tried several others but there is nothing compared to the original Quaker Oats recipe for Oatmeal Cookies.
For Quaker’s Oatmeal Raisin Cookie recipe click here.

Quaker Oats Oatmeal Cookie Recipe
Ingredients
3/4 Cup(s) firmly packed brown sugar
3/4 Cup(s) trans-fat free vegetable shortening
1/2 Cup(s) granulated sugar
1/4 Cup(s) Water
1 Teaspoon(s) vanilla
3 Cup(s) Quaker® Oats (quick or old fashioned, uncooked)
1 Cup(s) all-purpose flour
1 Teaspoon(s) salt (optional)
1/2 Teaspoon(s) Baking Soda
1 Egg(S)
Directions
Heat oven to 375°F. In large bowl, beat brown sugar, shortening and granulated sugar on medium speed of electric mixer until creamy.
Add egg, water and vanilla; beat well. Add combined oats, flour, salt and baking soda; mix well.
Drop dough by rounded teaspoonfuls onto ungreased cookie sheets.
Bake 9 to 11 minutes or until edges are golden brown. Remove to wire rack. Cool completely. Store tightly covered.
Everyone has their own personal spin and touches on how to make a meatloaf. My stepmom used to sauté the onions+ green peppers and add in those delicious bread crumbs and seasonings and always ketchup on the top. My mom? Well…she tried to make MeatLoaf. Once. I’ll never forget how it was so terrible that my stepdad vowed from then on HE would be the Meatloaf maker (thank God!)
I’ve always done my own thing with Meatloaf too. Onions. Salt and Pepper. I use crunched up crackers in the mix (whatever buttered crackers I have in hand) and two eggs. I leave out the green peppers because my husband doesn’t care for them. Ketchup on top. Easy Peasy.
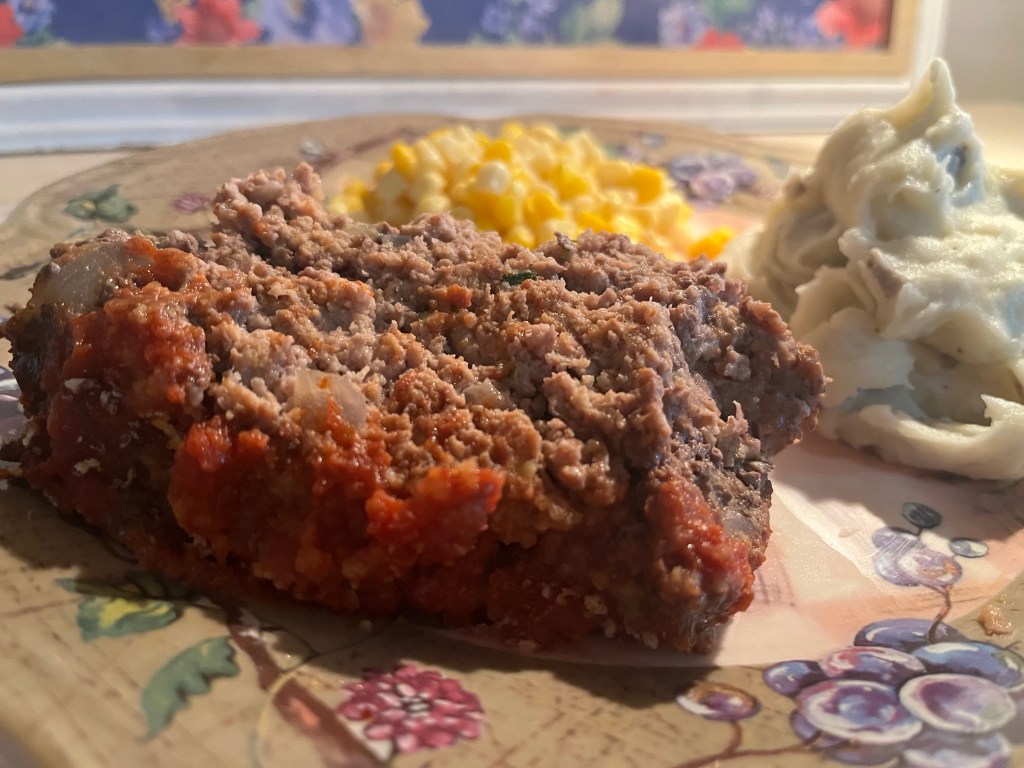
It was interesting to read Mrs Nixon’s personal recipe for Meatloaf. She used Thyme, Marjoram and S&P for her spices. As well as chopped parsley. The recipe even called for breadcrumbs on the top. It was totally different than what I’ve ever made but I thought I would give it a go. My husband was hesitant at first and a little unsure of how this different concoction would taste. But he loved it 👍 He even said that it’s the BEST meatloaf that I’ve ever made. Wow!
Meatloaf was absolutely President Nixon’s favorite food. He also enjoyed cottage cheese + ketchup for breakfast (but that’s another story!) So it’s an honor to have this recipe and eat something that President Nixon once enjoyed. It’s really special too being that it’s Mrs Nixon’s personal family recipe.
Former first lady Pat Nixon’s meatloaf recipe appeared years ago in the Pittsburgh Post-Gazette. In the article, it states, “This recipe for family-style meatloaf is from the Nixon administration and belonged to first lady Pat Nixon. It was so popular that the recipe was printed on White House stationery to be mailed on request.”
Here’s the recipe…make it and eat like a President tonight 🇺🇸
Pat Nixon’s Meatloaf
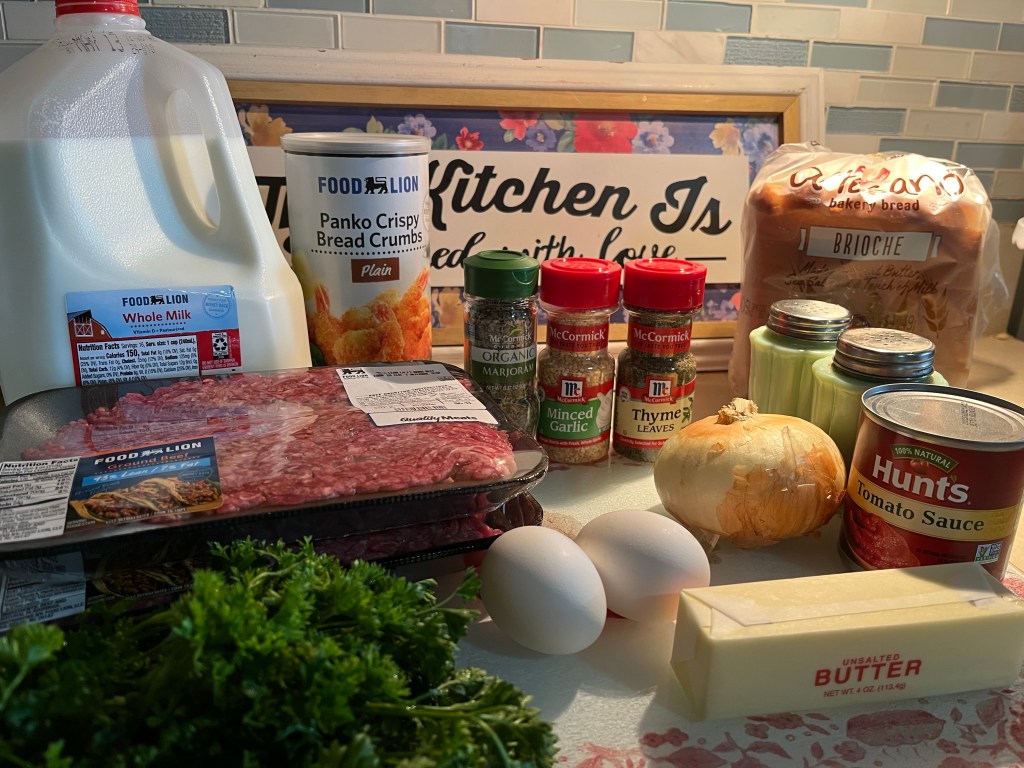
Ingredients
2 tablespoons butter
1 cup finely chopped onions
2 garlic cloves, minced (I used minced garlic)
3 slices white bead
1 cup milk
2 pounds lean ground beef
2 eggs, lightly beaten
1 teaspoon salt
Ground black pepper, to taste
1 tablespoon chopped fresh parsley
1/2 teaspoon dried thyme
1/2 teaspoon dried marjoram
2 tablespoons tomato puree (I used tomato sauce)
2 tablespoons bread crumbs
Directions
Grease a 13-by-9-inch baking pan. Melt butter in a saute pan, add garlic and saute until just golden — do not brown. Let cool.
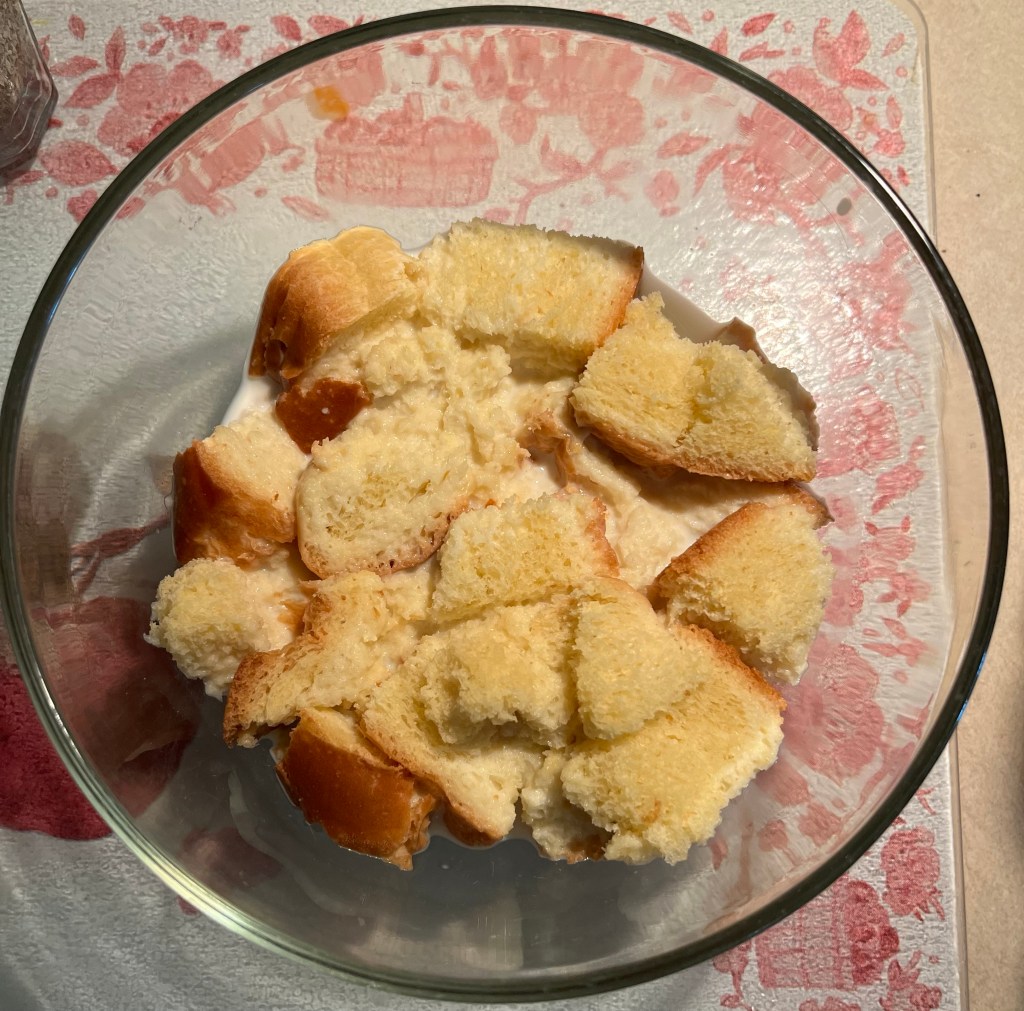
In a small bowl, cube the bread and soak it in the milk.
Sauté the onions
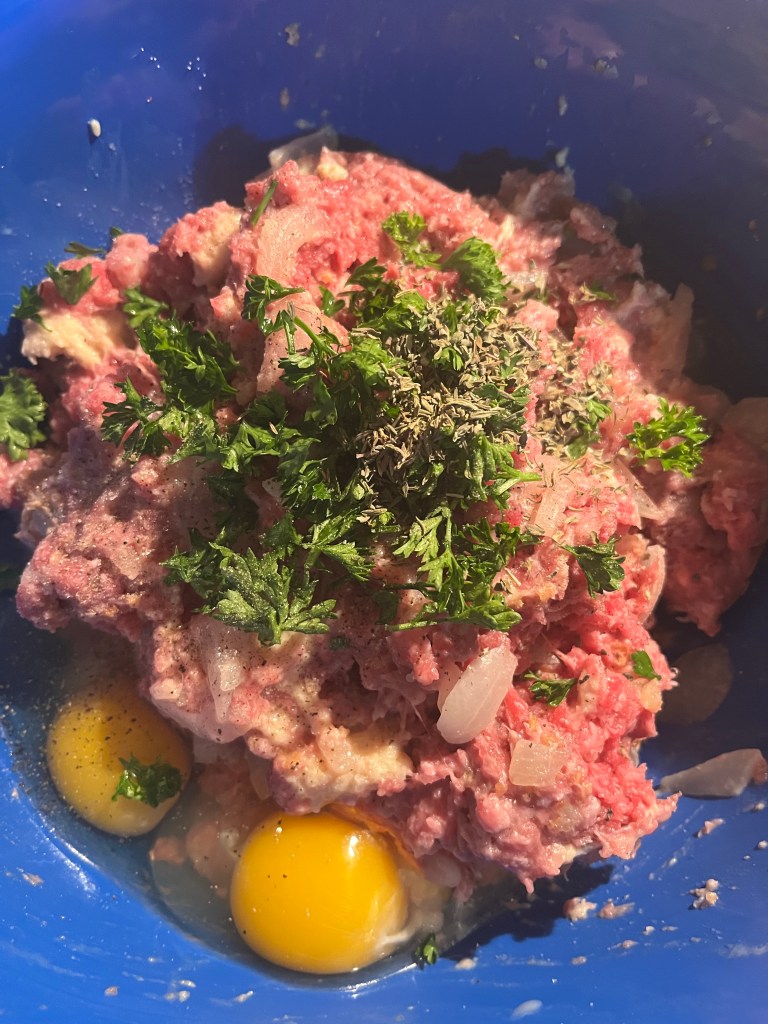
In a large mixing bowl, mix ground beef by hand with sauteed onions and garlic and bread pieces.
Add eggs, salt, pepper, parsley, thyme and marjoram and mix by hand in a circular motion.
Turn this mixture into the prepared baking pan and pat into a loaf shape, leaving at least one inch of space around the edges to allow fat to run off. Brush the top with the tomato puree and sprinkle with bread crumbs.

Refrigerate for 1 hour to allow the flavors to penetrate and to firm up the loaf.
Preheat the oven to 375 degrees. Bake meatloaf on lower shelf of oven for 1 hour, or until meat is cooked through. Pour off accumulated fat several times while baking and after meat is fully cooked. Let stand on wire rack for five minutes before slicing. Makes 6 servings.
Click here for the full recipe and for more information about Mrs Nixon’s Meatloaf.
I’ve been doing some research on how to eat healthier and to get more fruit + vegetables in my daily diet. It would be nice to be able to live off of donuts and cake for the rest of my life but let’s face it – that’s not the real world unfortunately.
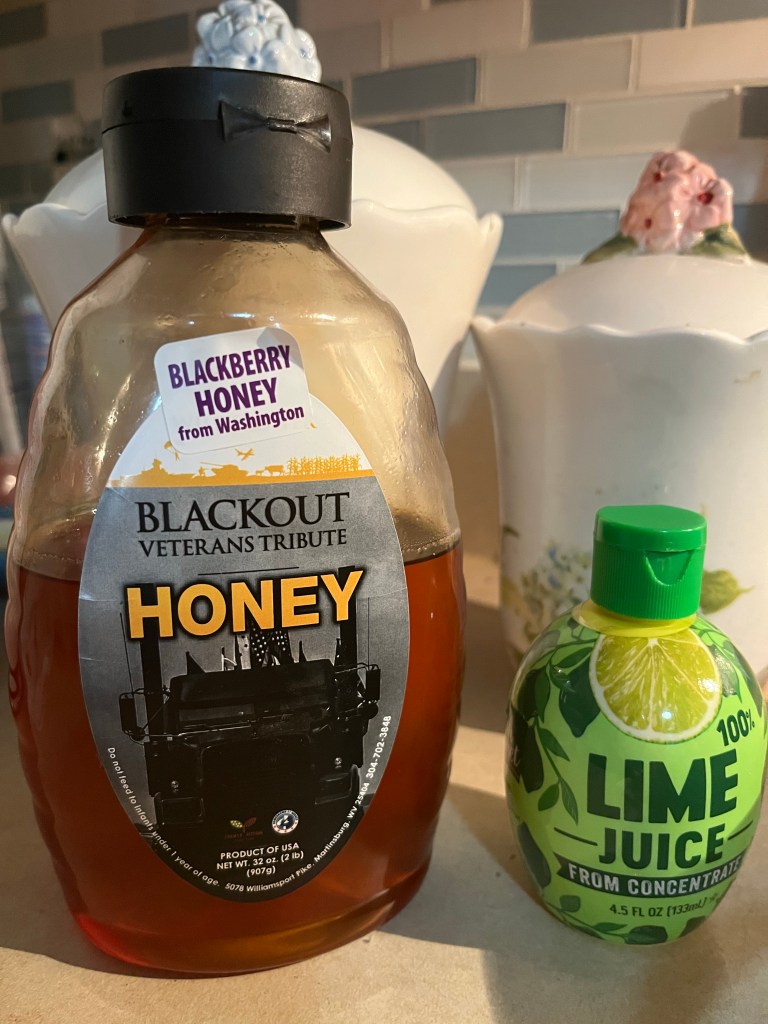
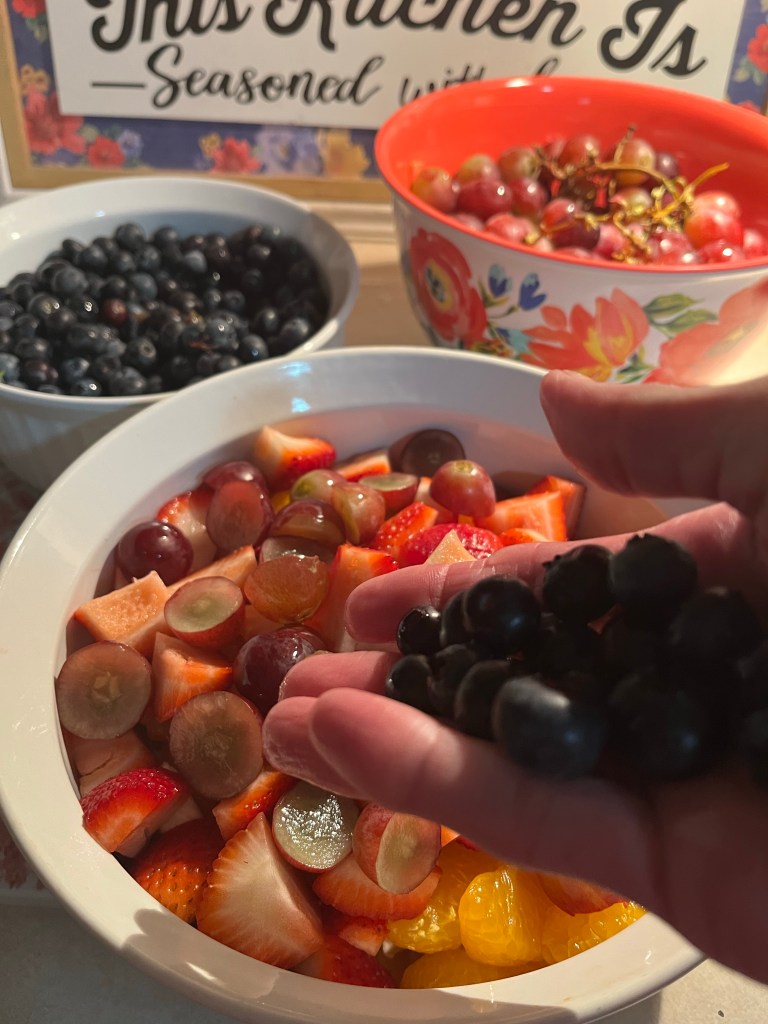
This fruit salad is packed with all of the delicious nutrients that you need plus it’s so incredibly delicious. Especially with the Honey Lime Dressing! It’s so easy to make and you can really use any type of fruit available to make it your own – although watermelon isn’t recommended due to its potential to soak up the dressing.
Rainbow Fruit Salad with Honey Lime Dressing

Ingredients
1 pound fresh strawberries (hulled and quartered)
1 can (15oz) of diced pineapple (drain the juice!)
12 oz of fresh blueberries
12 oz seedless red grapes, halved
1 can (15oz) mandarin oranges (drain the juice!)
2 ripe bananas, sliced
Honey Lime Dressing
1/4 cup honey
1 tablespoon lime juice
Directions
In a large bowl, combine all of the fruit.
In a small bowl, whisk together the honey and lime juice. Drizzle over the fruit right before serving.
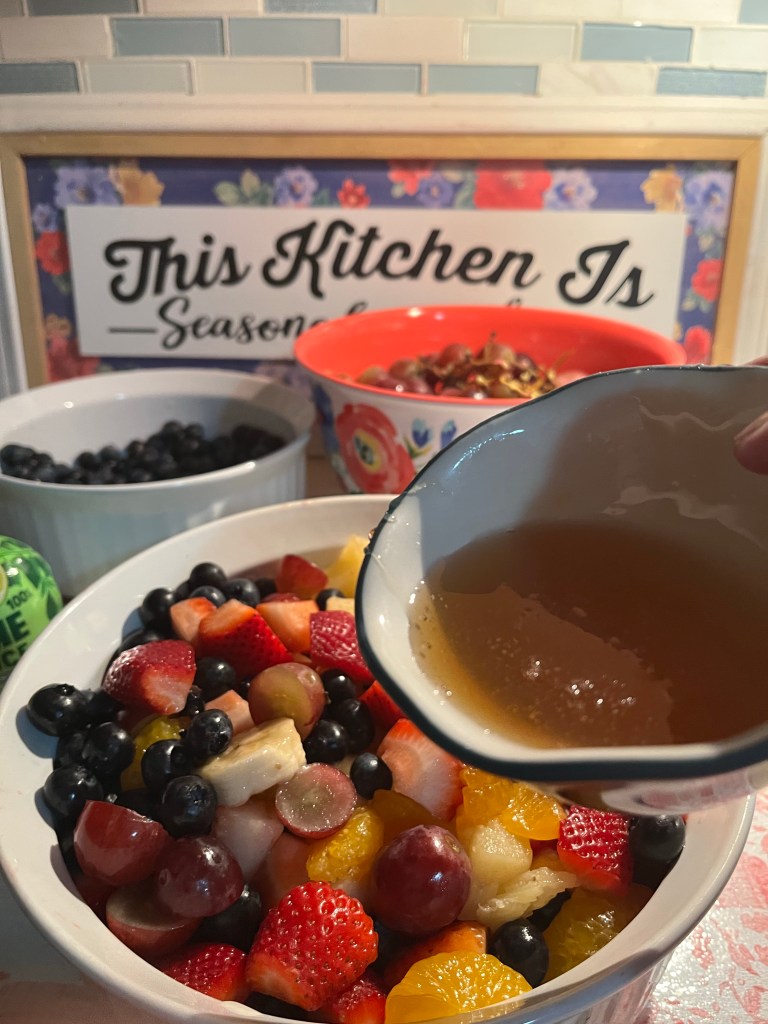
Gently toss the fruit to coat evenly.

I adapted the recipe from I am Homesteader. Make sure to check out their site with thousands of delicious recipes!
