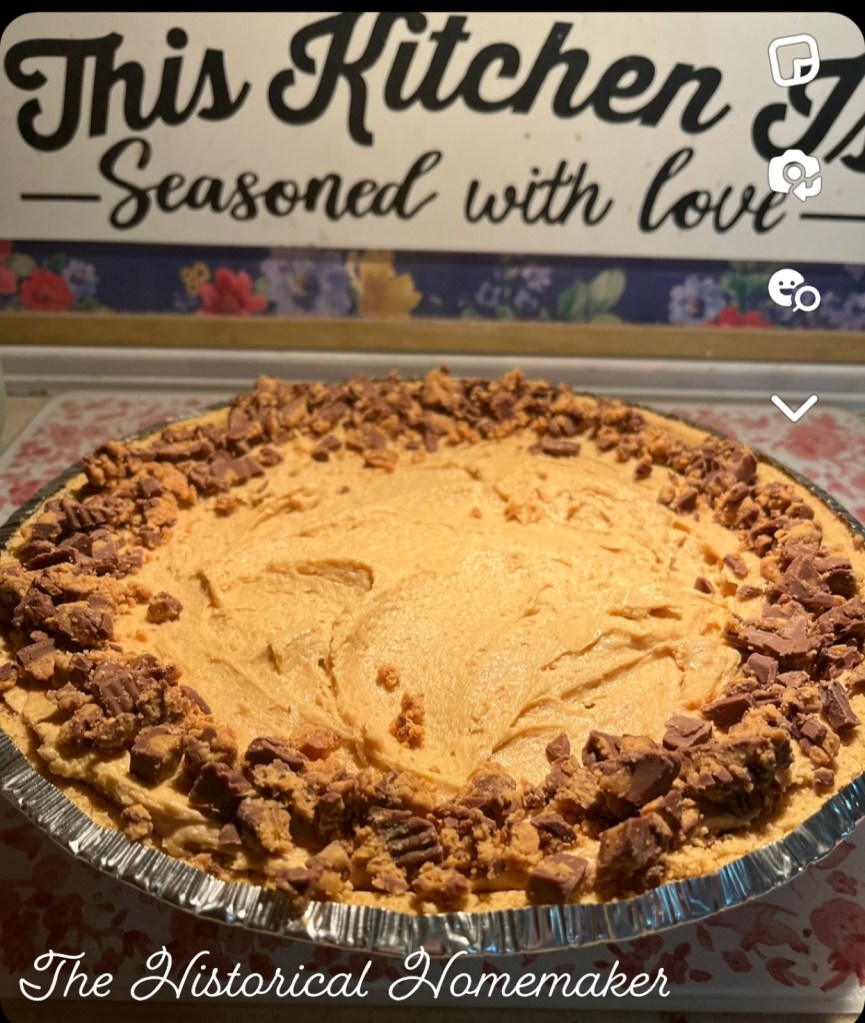
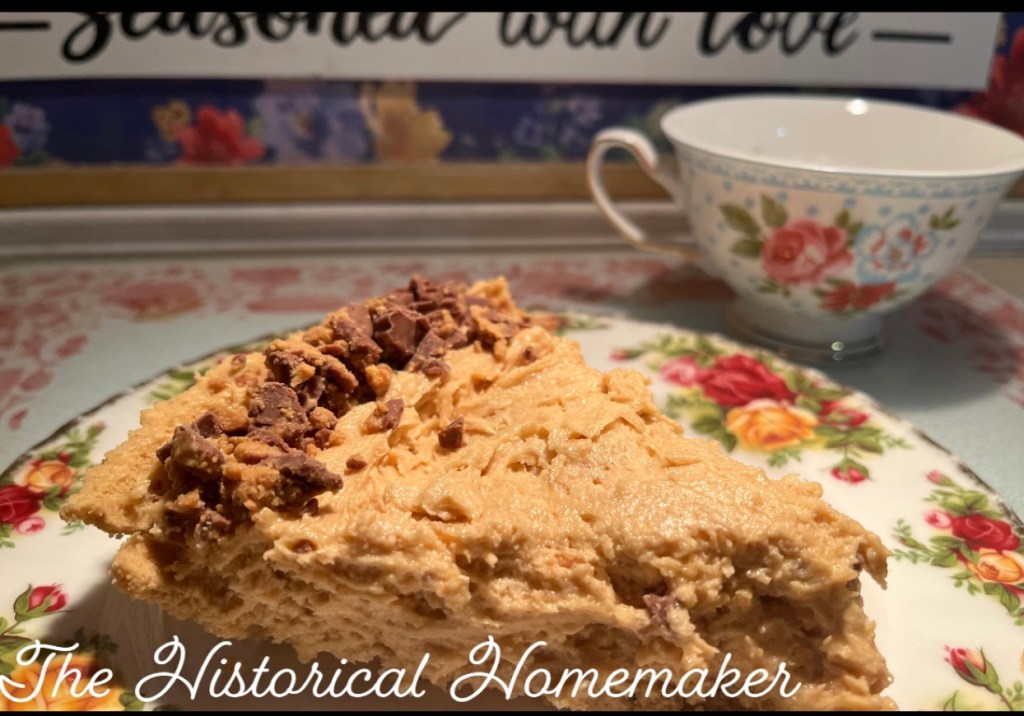
This is probably the easiest Peanut Butter Pie you’ll ever make! Only a few simple ingredients and you have a delicious pie. The hardest part is waiting for it to set and firm up for a few hours in the refrigerator before indulging.
Peanut Butter Pie
Ingredients
8 oz Cool Whip
8 oz Cream Cheese (1 Block, Softened)
1 cup of creamy peanut butter
1 cup of granulated sugar
1 tsp vanilla extract
1 graham cracker crust (I used ready made)
Optional: for decor, chopped Reeses Peanut Butter Cups or drizzle melted chocolate over the pie.
Or be creative and do your own thing 😊
Directions
In a medium bowl, cream the sugar, peanut butter, cream cheese and vanilla together.
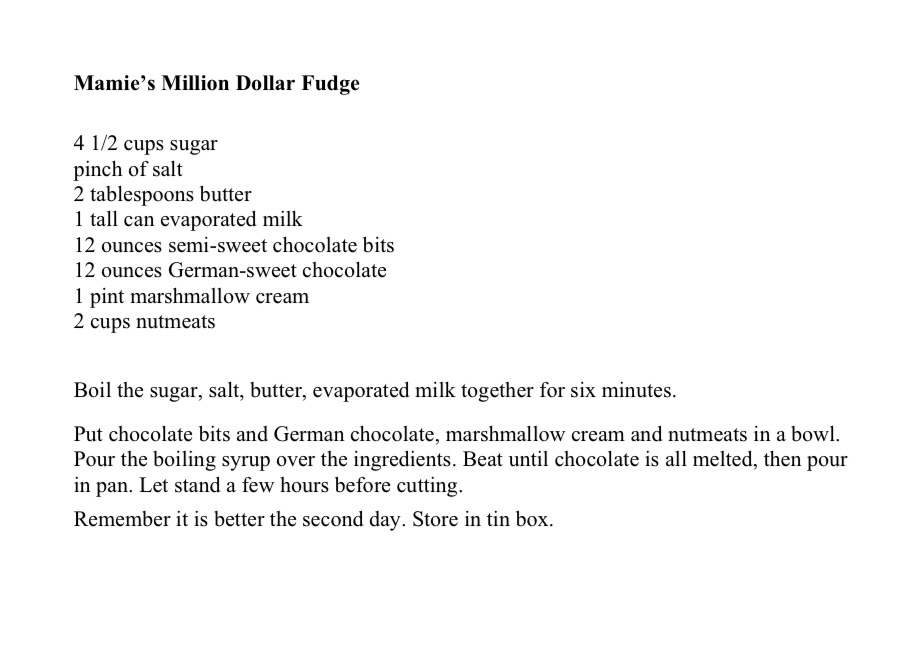
President Eisenhower loved vegetable soup and he had his own personal delicious recipe that he shared with the public. It’s interesting to read how recipes have changed in seventy or more years, isn’t it? It’s also quite fascinating to have a personal recipe from a President or First Lady. By the way…Mamie Eisenhower’s Million Dollar Fudge??!! It’s so decadent and amazing!
Ok…back to President Eisenhower’s Vegetable Soup. I kind of got sidetracked with the fudge 😋
Tonight in the kitchen I decided to use my own personal favorite…it has cabbage…onion…carrots…potatoes…all the good stuff! 😋
Homemade Vegetable Soup
Ingredients
3 tablespoons olive oil
2 cups chopped medium yellow onions
1 ½ cups chopped carrots (3 to 4 carrots)
1 ½ cups chopped celery (2 to 3 stalks)
2 tablespoons tomato paste (if you don’t have tomato paste, ketchup works too!)
4 teaspoons minced garlic (4 cloves) (optional)
3/4 teaspoon ground fennel seed (optional)
1/8 to 1/4 teaspoon crushed red pepper flakes (optional for those who like heat and spicy!)
1/2 teaspoon pepper
1/2 teaspoon salt, plus more to taste if needed
1 (15-ounce) can diced tomatoes with the liquid
6 cups stock or broth (I used chicken broth)
2 cups chopped medium potatoes (2 medium)
3 to 4 heaping cups of chopped or shredded cabbage
2 bay leaves (optional – don’t forget to remove when the soup is done!)
1 cup frozen peas
Optional: 1 pound of beef stew meat (my husband loves beef in his vegetable soup so we always have to add! He’s a “where’s the meat” type of guy 🤣
It tastes just as delicious as a vegetable soup without beef too.
Directions
Heat the olive oil in a stockpot pot or Dutch oven over medium heat. Add the onions, carrots, celery, cabbage and tomato paste. Cook and stir often until the vegetables have softened and the onions are translucent. This will take about 8 to 10 minutes.
Add the salt and pepper, fennel seeds and the red pepper flakes. Cook, while stirring, for one minute.
Pour in the canned tomatoes and their juices as well as the stock/broth.
Add the potatoes and if using bay leaves – add those. Raise the heat to medium-high and bring the soup to a boil. Partially cover the pot with a lid, and then reduce the heat to maintain a low simmer for about 20 minutes or longer until the potatoes and veggies are tender.
If you are adding meat, this is the time to cook it so it’s ready when the soup is finished.
Add the frozen peas and cook for five more minutes.
If using beef add to the soup and stir.
Remove from the heat and take out the bay leaves.
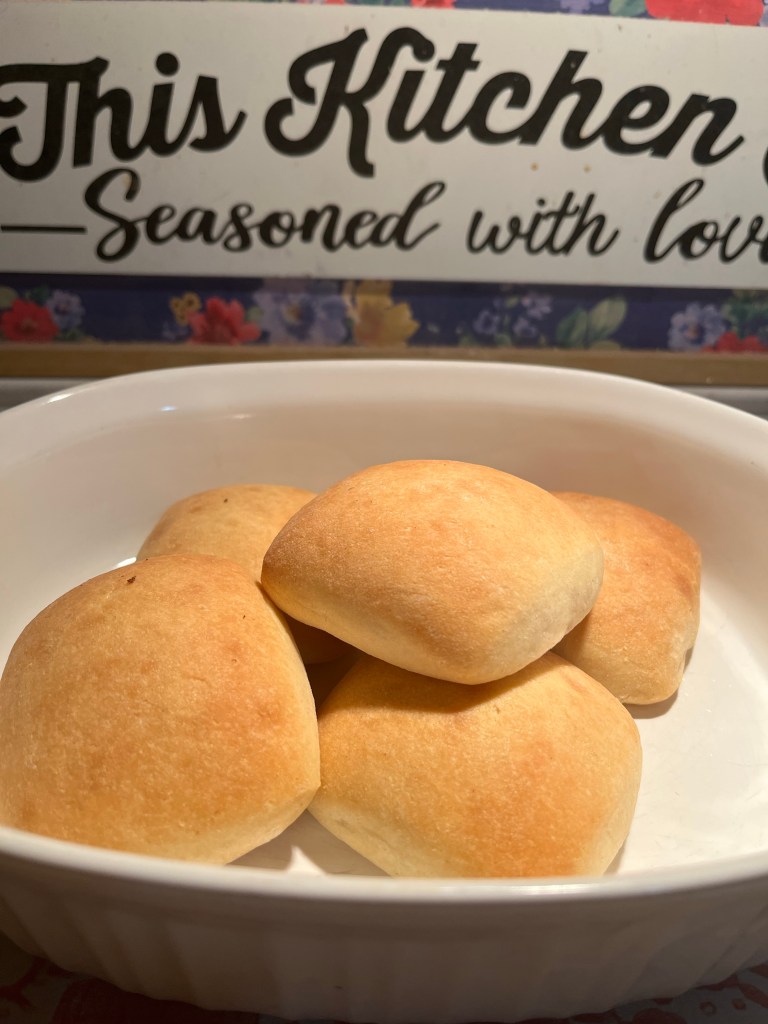
I served the soup with warm baked dinner rolls. Yummy!
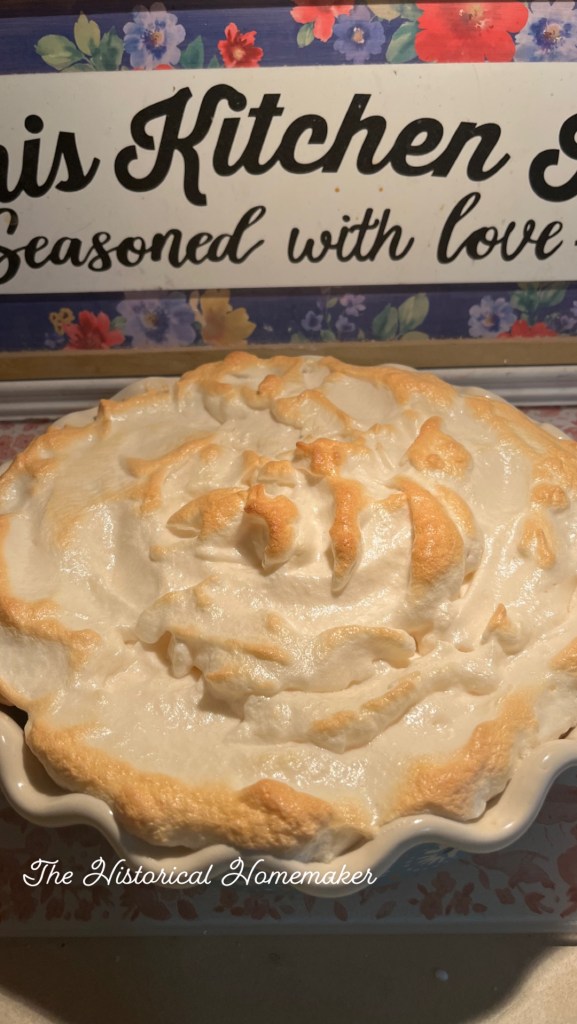
Homemade Lemon Meringue Pie is so delicious! I always found the hardest part is to make the meringue – which can be a bit complex because everything needs to go just right to make the perfect meringue. I use the recipe from The Recipe Rebel because it’s easy to make and always comes out incredibly delicious 😋
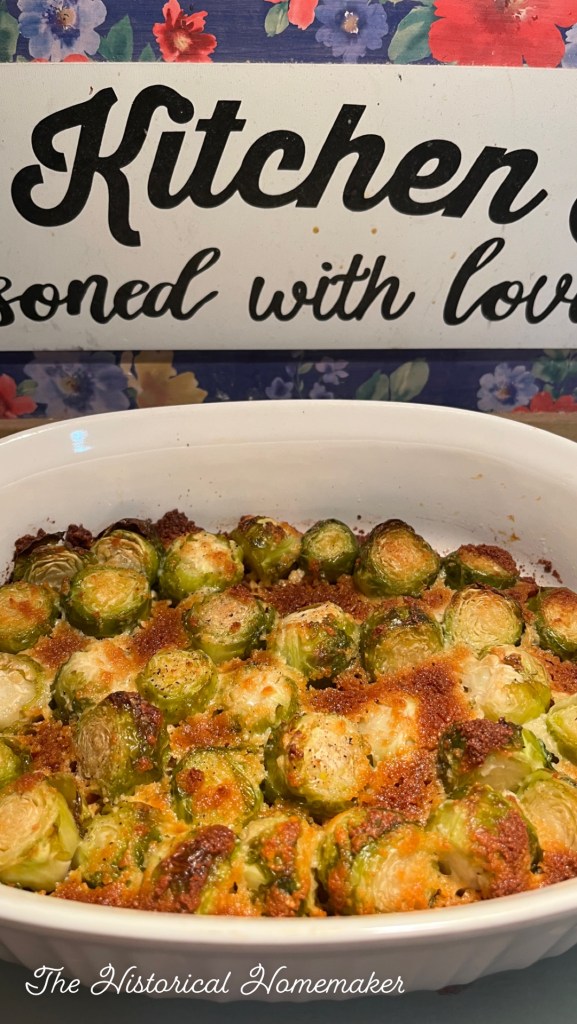
Who knew that Brussel Sprouts could taste so delicious! As a kid, I would cringe every time they were placed on my plate and would hide them under mashed potatoes…hide them under a napkin…or give (secretly) to the our family dog when my parents weren’t looking (sorry mom and dad! The secret is finally out!)
My daughter-in-law shared this recipe with me the other day and at first I cringed. But I figured…why not try? After all, this recipe called for Parmesan Cheese and everything tastes better with that!
So now I’m a huge fan of Brussel Sprouts. With this recipe my entire philosophy on them has changed and and a new love affair with them has been born 🤣
I just had to share this recipe with you because it’s so incredibly delicious and if you are like me and weren’t much of a fan of them…it might make you think differently too! These aren’t your traditional momma and grandma Brussel Sprouts that we ate as children that’s for sure!
Roasted Brussel Sprouts
Ingredients
1 pound Brussels Sprouts – cleaned and trimmed
3 cloves garlic peeled & sliced (I omitted the garlic because I’m not a huge fan of it)
¼ cup Parmesan Cheese, freshly grated
3 tablespoons olive oil
salt and freshly ground black pepper to add taste
Directions
Preheat the oven to 400 degrees
If needed, clean and trim the Brussels sprouts and cut them in halves and place them in an oven safe dish. Make sure to dry them very well before cooking.
Add the garlic, Parmesan cheese, salt, and pepper, followed by the olive oil. Toss to coat.
Roast in the oven Uncovered for 20-25 minutes until crisp, brown and caramelized on the outside and tender on the inside. Serve with more grated cheese.
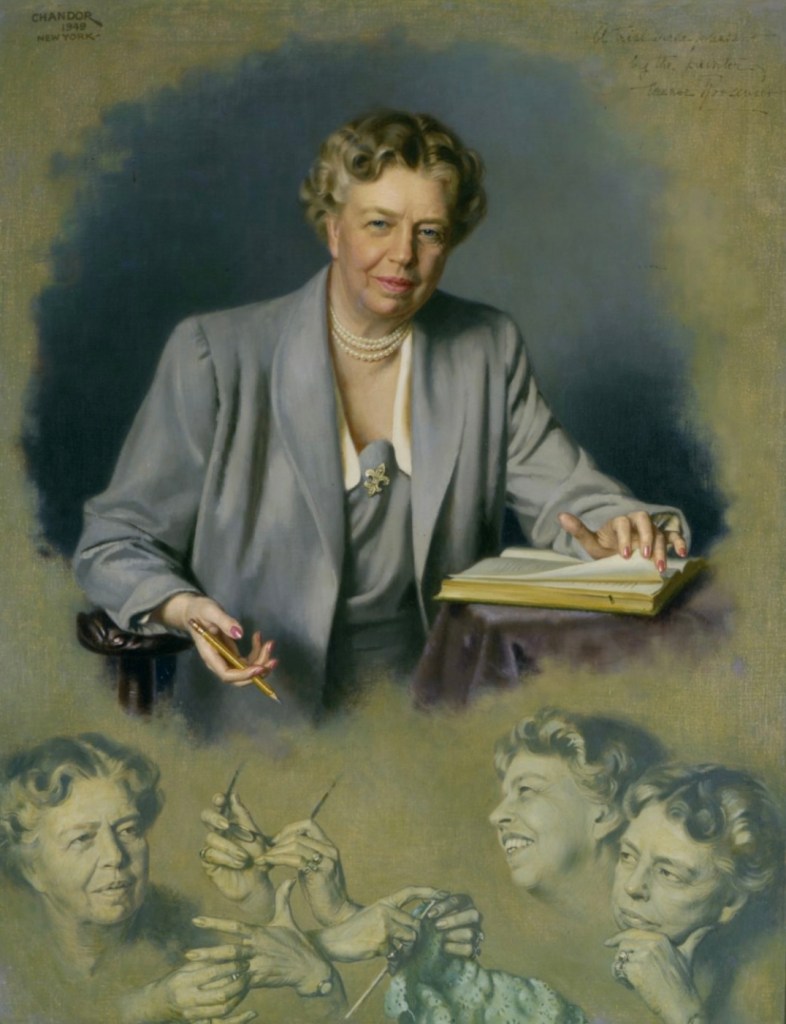
Eleanor Roosevelt was the First Lady during the era of The Great Depression. She was very mindful of this and The White House meals were often very frugal and she tried to implement a low-cost menu whenever possible.
Ernest Hemingway once dined with the Roosevelt’s at The White House and found the food to be not very spectacular. In a letter to his mother-in-law, Ernest Hemingway wrote of his dinner experience at The White House:
“…We had rainwater soup followed by rubber squab, a nice wilted salad and a cake some admirer had sent in by an enthusiastic but unskilled admirer.”
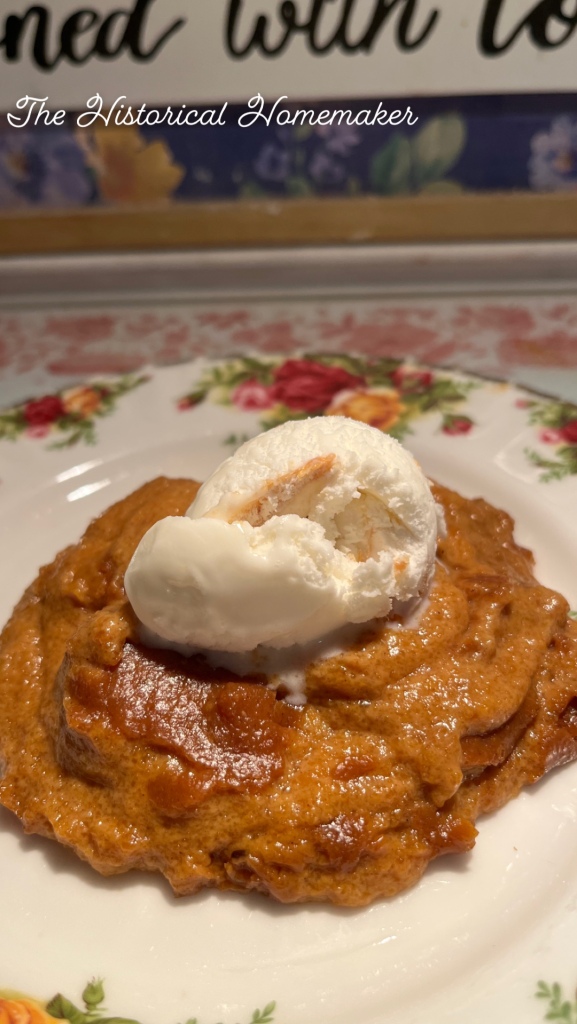
Eleanor Roosevelt did, however, indulge in her favorite dessert during these years – which was also a favorite of her Uncle Theodore Roosevelt’s as well.
Her favorite dessert was quite simple and was a delicious and simple Hasty Pudding.
Hasty Pudding was once referred to as Indian Pudding. The dessert most likely originated in Britain and the recipe brought over by the colonists. While the British recipe consisted of flour, the American colonists used cornmeal because of the abundance of corn in the colonies. As the recipe evolved, it incorporated the use of sugar or molasses, eggs and spices to the ingredients.
Hasty pudding is not a very elegant dessert and is often referred to as mush because well…it’s kinda mushy. It didn’t stop Eleanor Roosevelt from serving it at The White House for dessert at a Thanksgiving Dinner meal one year. Instead of the traditional pumpkin pie, she served Hasty Pudding. She also made sure to top it with vanilla ice cream.
Here’s a wonderful recipe for Hasty Pudding. It’s very easy to make and how wonderful to be able to taste and enjoy something Eleanor (and Teddy!) Roosevelt enjoyed so very much during their lifetime.
Hasty Pudding
Ingredients
2 cups whole milk
1 cup heavy cream
½ cup molasses
¼ cup brown sugar
⅓ cup cornmeal
1 teaspoon ground ginger
1 teaspoon cinnamon
¼ teaspoon salt
Optional: Vanilla Ice Cream or Whipped Cream for a topping
Directions
Preheat your oven to 350 degrees. In a medium saucepan, bring the milk, heavy cream, molasses and brown sugar almost to a simmer over moderately high heat, stirring occasionally.
In a medium bowl, whisk together the cornmeal, ginger, cinnamon and salt.
Add the cornmeal mixture to the milk mixture and whisk together. Bring to a simmer and keep whisking.
Pour the mixture into an 8-by-8-inch baking dish. The batter will be thin.
Bake the pudding in the middle of the oven for 20 minutes. Remove from the oven and stir well and then return the pudding to the oven and continue cooking for another 20 minutes.
Remove from the oven.
The pudding will still be quite wobbly but will set as it cools. Let it cool for 20 minutes and serve warm.
For extra deliciousness, serve the pudding topped with vanilla ice cream or whipped cream.
Today in American history…Anna Eleanor Roosevelt was born on October 11, 1884 in New York City.
Childhood Photo of Eleanor Roosevelt School Photo of Eleanor Roosevelt at age fourteen in 1898
“We do not have to become heroes overnight. Just a step at a time, meeting each thing that comes up, seeing it as not as dreadful as it appears, discovering that we have the strength to stare it down.” – Eleanor Roosevelt
Official White House Portrait (White House Historical Society)
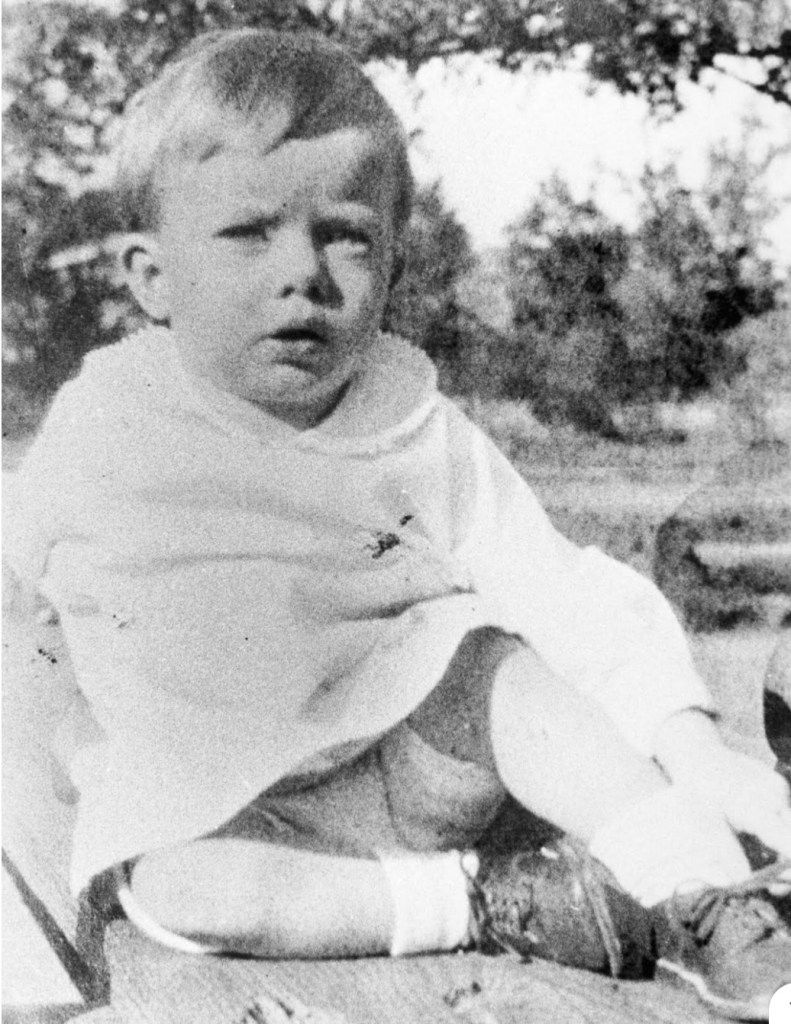
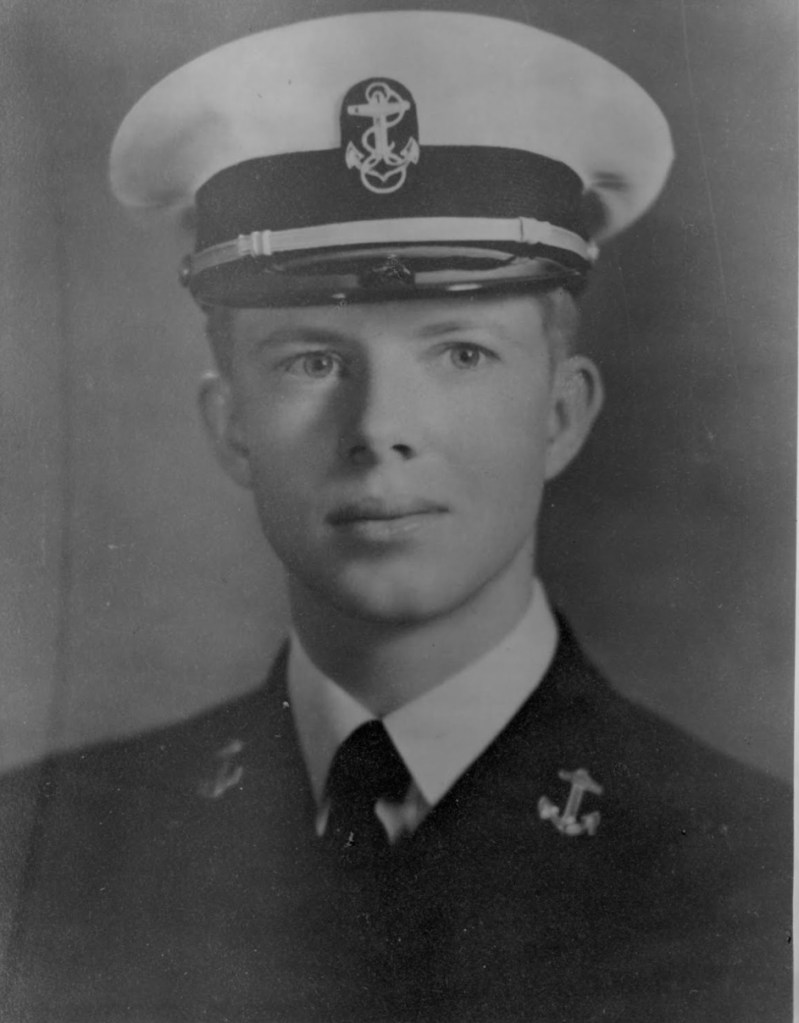
Today in American history…James Earl Carter Jr. was born October 1, 1924, in Plains, Georgia to Bessie Lillian Gordy and James Earl Carter, Sr.
Childhood Photo (Getty Images) First Grade Photo (Getty Images)
He served as our Nation’s 39th President from 1977 to 1981.
President Carter is the oldest former President in American history.
A few years ago when asked about the secret to his longevity he responded “It’s hard to live until you’re 95 years old. I think the best explanation for that is to marry the best spouse, someone who will take care of you and engage and do things to challenge you and keep you alive and interested in life.”
Former Naval Officer. Governor of Georgia. President of the United States of America. Humanitarian. Statesman. Farmer. Volunteer with Habitat for Humanity. Sunday School Teacher. Husband. Father. Grandfather.
Happy 99th Birthday, President Carter. Thank you for your lifelong service to our country and to the world.
It’s starting to feel a little like Halloween 🎃 The cooler weather is now upon us after a very hot Summer (and we finally got rain!)
My son sent this cute recipe to me the other day from something he had seen on TikTok. It looked like so much fun and I thought it looked perfect to make to welcome Fall. They are so easy to make, too! Would be a great idea to make with kids too. Especially to encourage them to eat their vegetables (if they are anything like I once was (or still am 🤣)
Everyone has their own recipe of what they like to use for their stuffed peppers so for this fun dinner recipe I would just recommend to use your own and be creative with the “pumpkin” faces. Many thanks to my husband and his incredible carving skills!
This recipe is what I used to make the stuffed peppers but you really can improvise. Have fun! Oh and…Welcome Fall! We’ve missed you! 🍁
Stuffed “Pumpkin” Peppers Recipe 🎃
Ingredients
3-5 Orange Bell Peppers
1 package of Ground Turkey (Ground Beef works well too)
1 Bottle of Tomato Sauce
1 Bag of Minute Rice
1 8oz package of shredded cheese (we used Sharp White Cheddar but you can use whatever is your favorite!)
Salt and Pepper (or your favorite seasonings)
Directions
Preheat your oven to 350 degrees.
Cut the tops off of the bell peppers (make sure to save those, set aside!) and clean/scoop out the inside of the peppers.
Place the peppers in boiling water for 2-3 minutes to soften. Remove and set aside.
Cool the ground turkey in a skillet until done.
Boil the bag of rice according to package instructions.
Mix the cooked rice into the cooked turkey. Add the pasta sauce. Combine thoroughly. Add Salt and pepper or whatever seasonings you prefer.
Place your peppers on a baking sheet and stuff each with the meat mixture. Sprinkle with cheese.
Bake for 25-30 minutes.
Remove from the oven. Add the top of the peppers – will look like pumpkins. So cute!
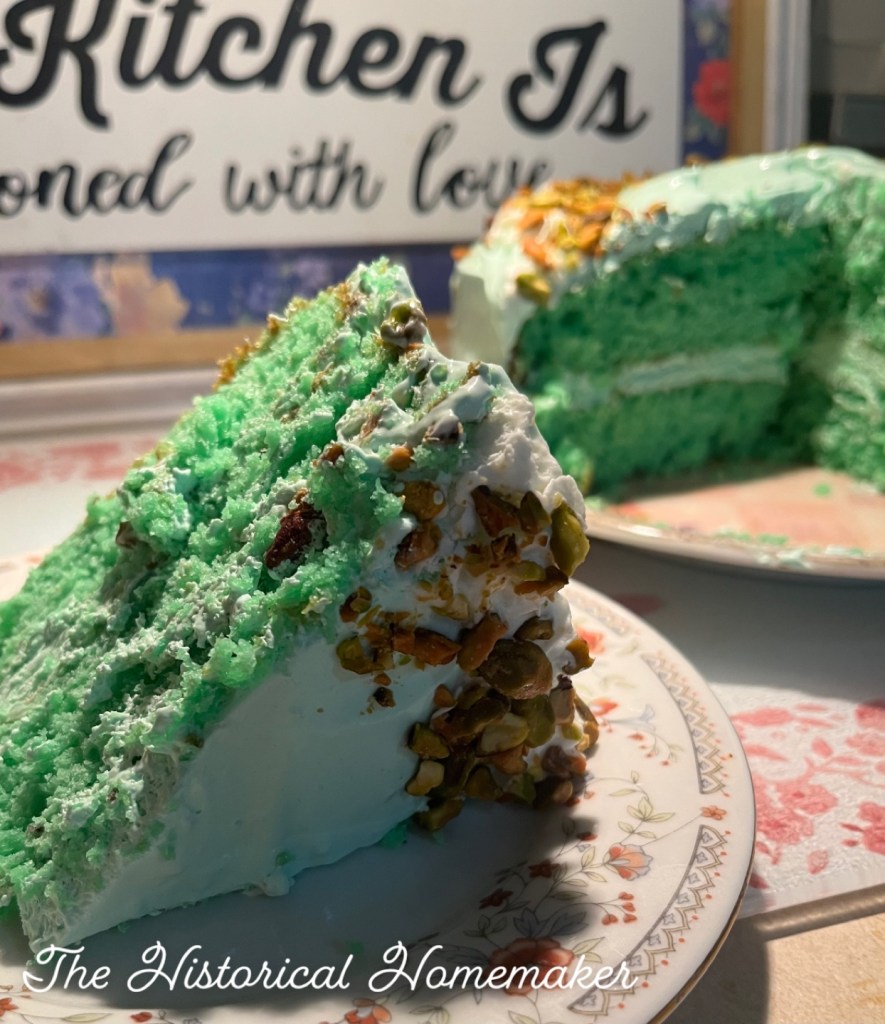
It’s always wonderful having family together – especially for a meal. For dinner last night, I made a family favorite: Homemade Lasagna along with Pistachio Cake w/Pistachio Frosting for dessert ❤️
Growing up in an Italian family, we had some sort of pasta with nearly every meal. Especially when visiting my grandmother Marini. She made the best homemade ravioli, chicken cacciatore and of course…lasagna. Dessert was often her homemade Almond Biscotti served with fresh coffee.
As a child, I would carefully watch as my mother made her homemade meatballs and I couldn’t wait to taste them. When she made lasagna it was always for special occasions like a birthday or Christmas.
One year, my sister made pans of lasagna to give away as Christmas gifts. Italian food, red wine and laughter were always a part of our home. I miss these days so very much.
I’m thankful for the memories, traditions and for the times of being with my Italian grandmother and mother in the kitchen. They didn’t follow recipes but instead used a “pinch of this” and a “pinch of that” and everything came out perfect.
I get asked for my lasagna recipe and I really don’t have one. It’s all banked in my memory of how my mother, sister and grandmother made it – so therefore it’s what I do as well. But I wanted to share with you…directly from my memory bank…so that you can have this deliciousness on your table for dinner too I’m with your family and friends.
Mangia! Viva Italia! 🇮🇹❤️
Homemade Lasagna
(For 10-15 hungry people!)
Ingredients
2 Boxes of Lasagna Noodles
1 Large Bottle of Pasta Sauce (I airways use Ragu – it’s a tradition and favorite)
2 -3 pounds of Ground Beef
32 oz and 15 oz Ricotta Cheese
1 1/2 Cups shredded Parmesan Cheese
4 Cups Shredded Mozzarella Cheese (reserve a cup and set aside)
3 Eggs
Your favorite Italian Seasonings
Directions
Preheat your oven to 350 Degrees.
In a large pot, boil the water for your lasagna noodles. Add a touch of olive oil (to prevent the noodles from sticking together) along with a pinch of salt. Cook according to package instructions and constantly stir the noodles. When done, drain the water and set aside.
Cook the ground beef in a skillet. Add your favorite seasonings. I always use salt, pepper and minced onions. When cooked thoroughly, drain the grease from the skillet and add the pasta sauce, stir and combine really well. Put on a low simmer.
For the cheese mixture, add the Ricotta, Parmesan, Mozzarella into a large bowl. Add the eggs and your favorite seasonings. Mix and combine really well.
Start the layering.
In a very large lasagna pan, begin by adding sauce to the bottom of the pan and spread evenly.
Add a layer of lasagna noodles lengthwise across.
Add the meat/pasta sauce mixture evenly across.
Add lasagna noodles lengthwise across.
Add the cheese mixture and spread evenly.
Continue to layer with lasagna noodles, meat/pasta sauce mixture and cheese mixture. Continue layering – last layer is lasagna noodles lengthwise across.
Add pasta sauce to the top layer.
Put foil over the top of the pan.
Bake for 45-50 minutes.
Bake for 35 minutes. Remove the pan from the oven, remove the foil and sprinkle a cup of mozzarella cheese over the top. Bake uncovered for 15 minutes.
Remove from the oven.
Let the lasagna sit for about 10-15 minutes so that it will settle and will be easy to cut into.
Enjoy!
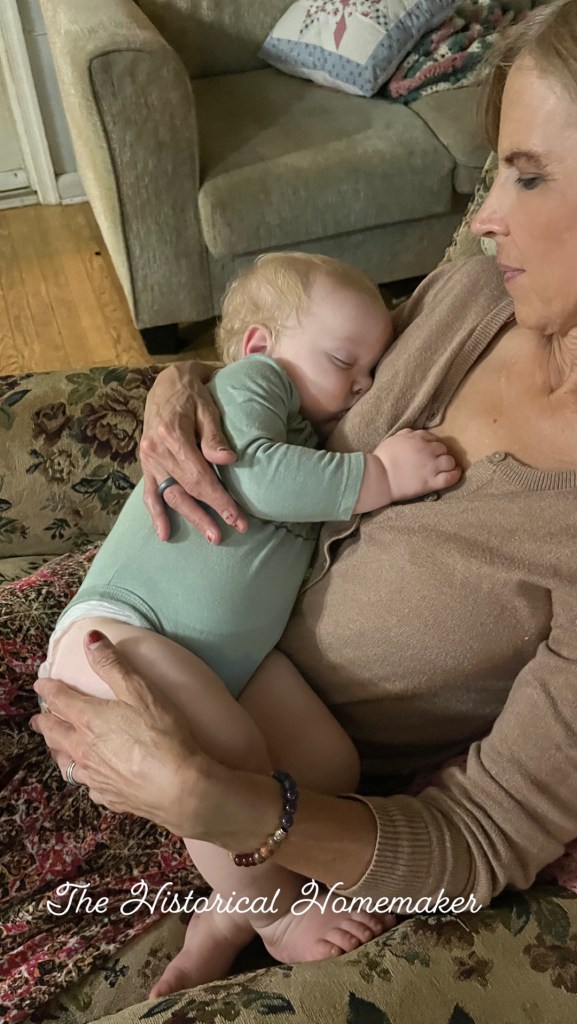
One of the best parts of having the family together is when you are so full you just fall asleep in each others arms ❤️