There is nothing better than the combination of peanut butter and chocolate. It’s one of the most ultimate and decadent comfort candies (Reese’s Peanut Butter cups…OMG)
Recently when I asked my stepson, Ian, what kind of cake he wanted for his birthday and he suggested peanut butter – and his girlfriend, Gracie, suggested chocolate frosting…my heart was very happy 😊
PS. I am all about using generic brands – which work just as well. But there are a few exceptions like peanut butter and chocolate that I use the trusted brands that I love the most and that’s Jif Peanut Butter and Hershey’s Chocolate.
Homemade Peanut Butter Cake w/Hershey’s Chocolate Frosting

Ingredients for the Peanut Butter Cake
2 cups all-purpose flour
1 ½ teaspoons baking powder
½ teaspoon baking soda
¼ teaspoon salt
¾ cup vegetable oil (I used canola oil which worked perfectly!)
1 ½ cups light brown sugar
¾ cup smooth peanut butter (I always use Jif – it’s my personal favorite!)
3 large eggs
2 teaspoons vanilla extract
⅓ cup sour cream
¾ cup milk
Ingredients for Hershey’s Chocolate Frosting
1/2 cup butter (or margarine (one stick)
2/3 cup Hershey’s Cocoa
3 cups Powdered (Confectioners) Sugar
1/3 cup Milk
1 tsp vanilla extract
Directions for Peanut Butter Cake
Preheat your oven to 350 degrees.
Grease two cake pans very well. I always grease the pan, layer of parchment paper on the bottom and then grease again. This gives you extra protection from the cake sticking to the pan!
In a medium bowl, whisk the flour, baking soda, baking powder and salt together.
Then in a separate large bowl, beat together the oil, light brown sugar and peanut butter until all is a smooth texture. You can beat by hand or a hand mixer – however you prefer.
Into the large bowl, add in the eggs and vanilla extract. Whisk in the sour cream. Do not over mix – just enough to combine the ingredients.
Mix in about 1/2 of the dry ingredients from the small bowl and then add the milk. Mix thoroughly.
Then add the rest of the dry ingredients until the flour mixture is incorporated.
Divide and pour the batter evenly into the prepared cake pans and put into the oven to bake.
Bake for 25 minutes. Use a toothpick to check for doneness. If not completely done, keep checking every 3 minutes.
When completely baked, remove from the oven.
Cool for about ten minutes and remove the cake from the pans onto a cooling rack.
Start making your frosting…
Directions for Hershey’s Chocolate Frosting
Melt butter. Stir in cocoa. Alternately, add powdered sugar and milk, beating to spreading consistency.
Add small amount additional milk, if needed. Stir in vanilla.
When the cake is completely cooled (in about an hour) start frosting.
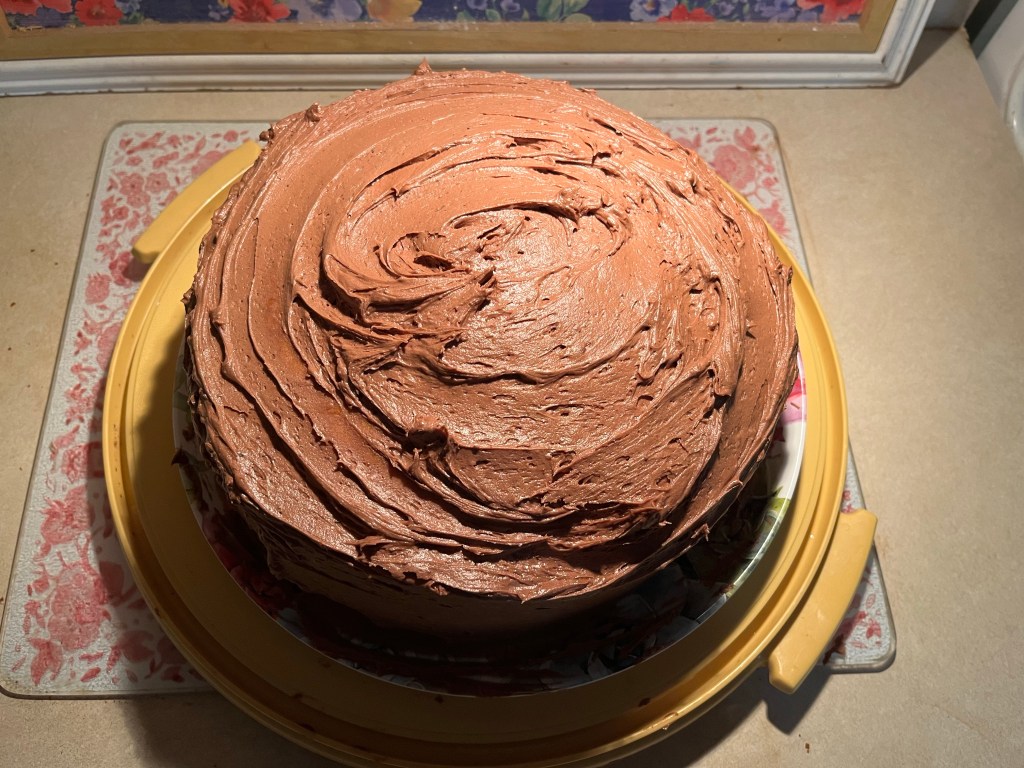
I used Reese’s mini peanut butter cups (unwrapped) for garnishing to give the cake extra chocolate and peanut butter deliciousness! 😋