Today in American history…Sandra Day O’Connor was born on March 26, 1930 in El Paso, Texas and grew up on a cattle ranch near Duncan, Arizona.
“I wanted to be a cattle rancher when I was young, because it was what I knew and I loved it.” – Sandra Day O’Connor
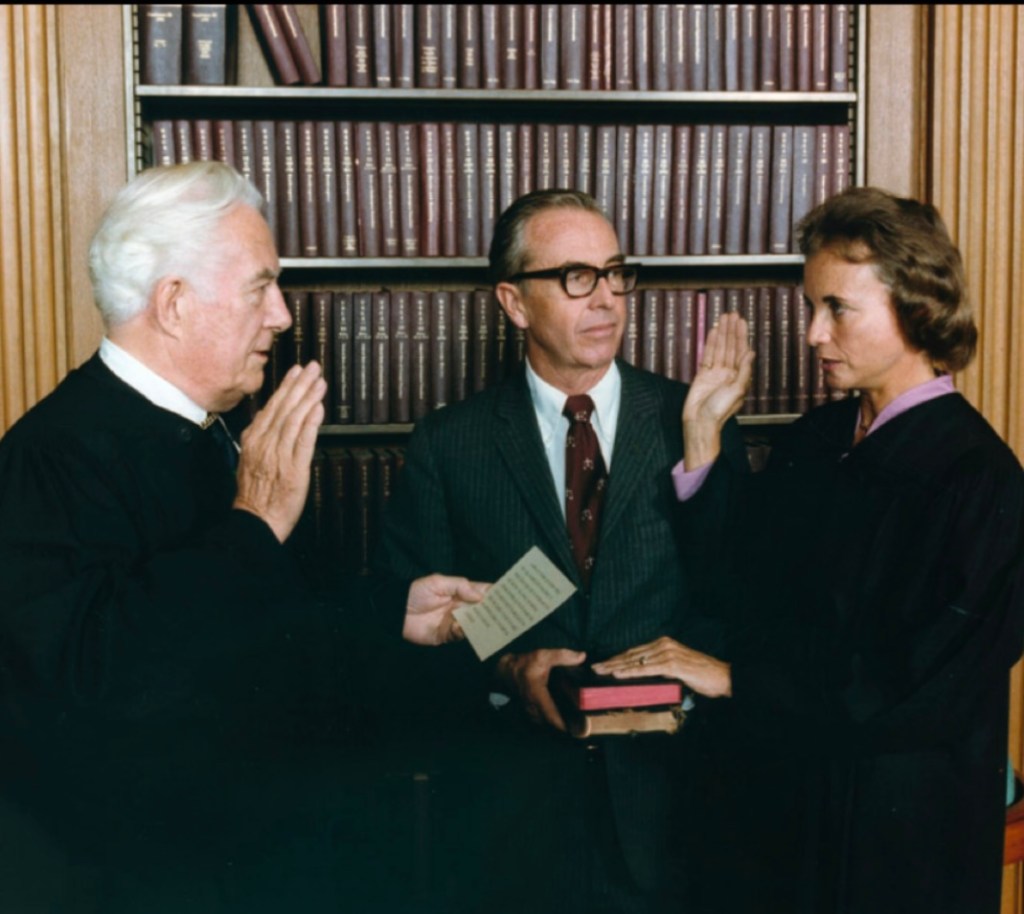
She would make history when she became the first woman nominated AND the first woman to be confirmed as an Associate Justice of the Supreme Court of the United States on January 25, 1981. She was an Associate Justice until she retired on January 31, 2006.
Being officially sworn in to become an Associate Justice on the Supreme Court of the United States
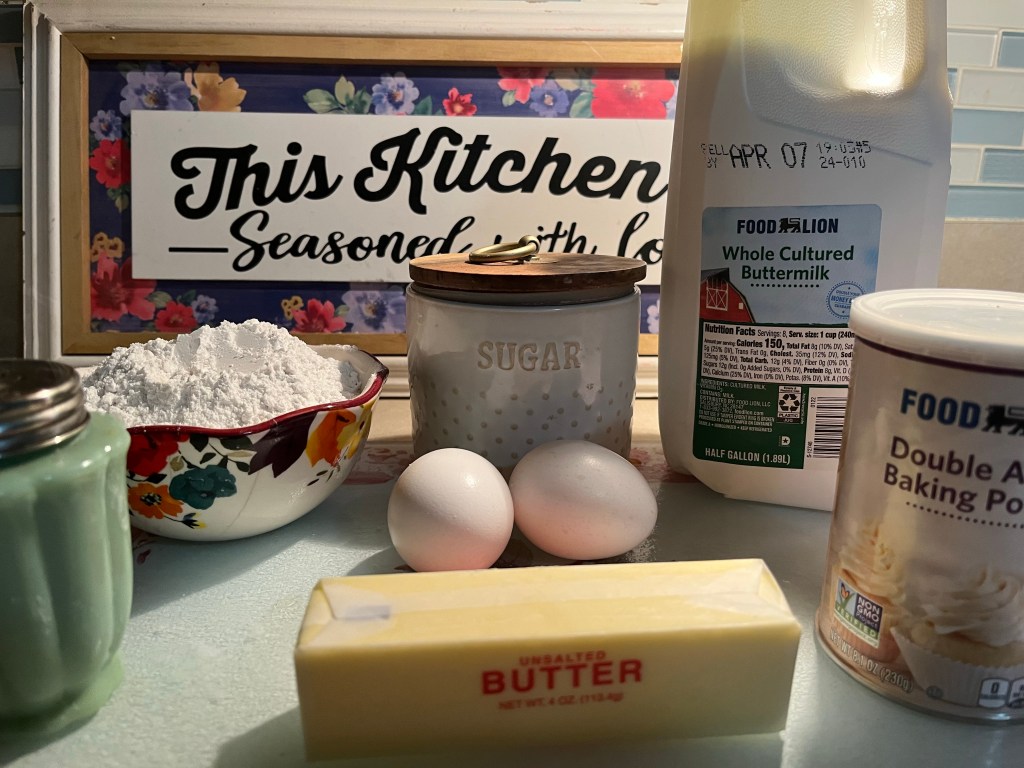
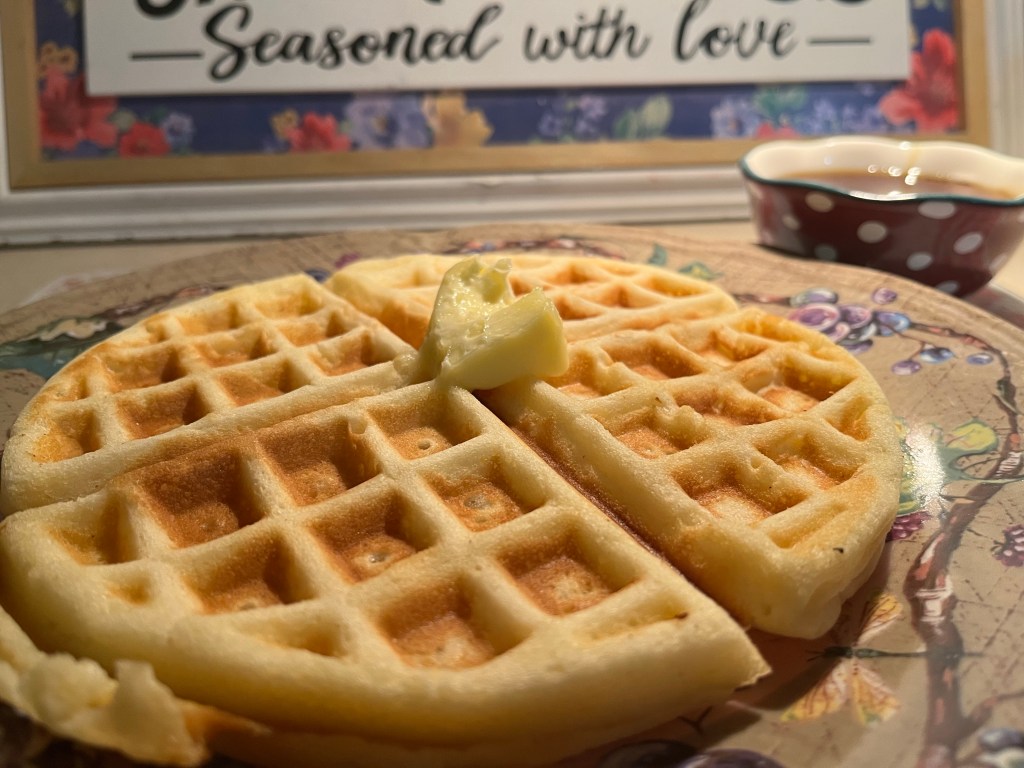
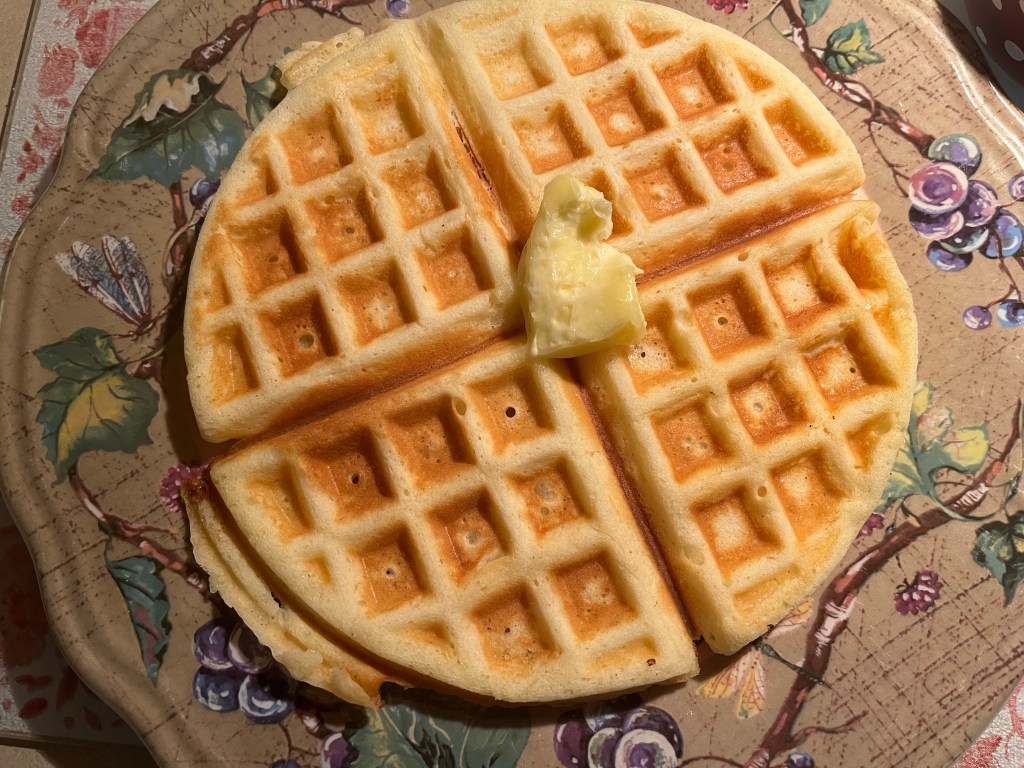
Happy National Waffle Day! To celebrate, we made waffles this morning using President Kennedy’s favorite family recipe. The waffles were so delicious, light and airy. I believe this to be our family’s “go-to” waffle recipe from now on 👍 It’s also really wonderful just to eat something President Kennedy once enjoyed ❤️
Here’s what you need to get started
Ingredients
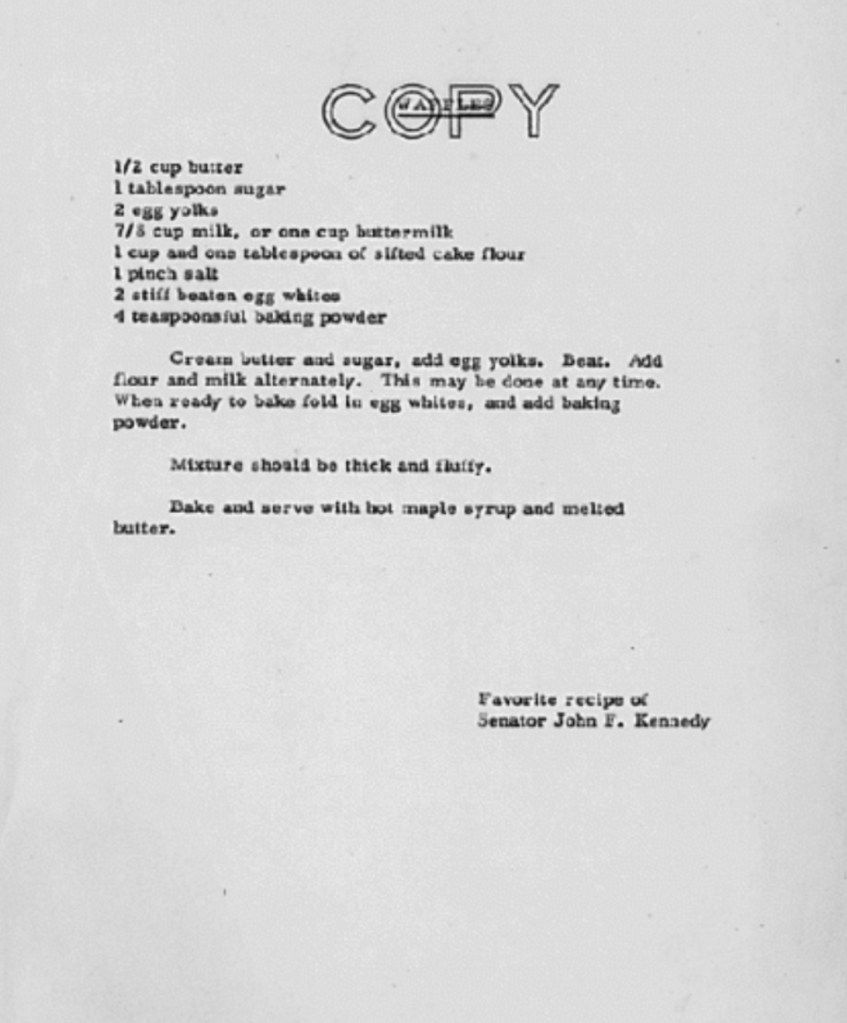
1/2 cup butter (softened)
1 tablespoon sugar
2 egg yolk
7/8 cup milk or one cup buttermilk
1 cup and one tablespoon of sifted cake flour
1 pinch salt
2 stiff beaten egg whites
4 teaspoons of baking powder
Directions
Cream butter and sugar, add egg yolks. Beat. Add flour and milk alternately. This may be done at any time.
When ready to bake, fold in egg whites, and add baking powder.
Mixture should be thick and fluffy.
Bake and serve with hot maple syrup and melted butter.
A copy of John Kennedy’s favorite waffle recipe. Courtesy of The National Archives/J.F.K. Presidential Papers.
To be honest…Angel Food Cake isn’t one of those that I tend to go towards first. Now put a White Cake flavored with almond + almond buttercream icing? I’m all over that bad boy! But…Angel Food Cake is healthy. Spongy but healthy. Did I mention it’s spongy 😳
To make it more tantalizing to my tastebuds, instead of layering it with just Cool Whip topping – I add a twist and mix Greek vanilla yogurt in with the Cool Whip. Plus, ya gotta throw some fresh berries on it too! Makes it extra delish and healthy for you. Pretty too!
It’s so easy. I just used a Angel Food Boxed Cake Mix (my grandmother Marini would be frowning over the boxed cake thing. She totally looked down on THAT but hey…I’m in a hurry, Grandma!)
Bake the cake according to the box directions. Let it cool to room temperature.
Meanwhile, in a medium bowl, mix 8 ounces of Cool Whip with 8 ounces of vanilla Greek yogurt (btw you can use other yogurt flavors too – get creative and make it your own thing!)
Spread the mixture on the first layer. Add the mixed berries. Than spread on the top layer and add the rest of the berries. Refrigerate until ready to use.
If you have any cool whip/yogurt mixture left over, save it to use to dip your fruit in the next morning with some added granola or better yet…just take a spoon and eat it right out of the bowl!
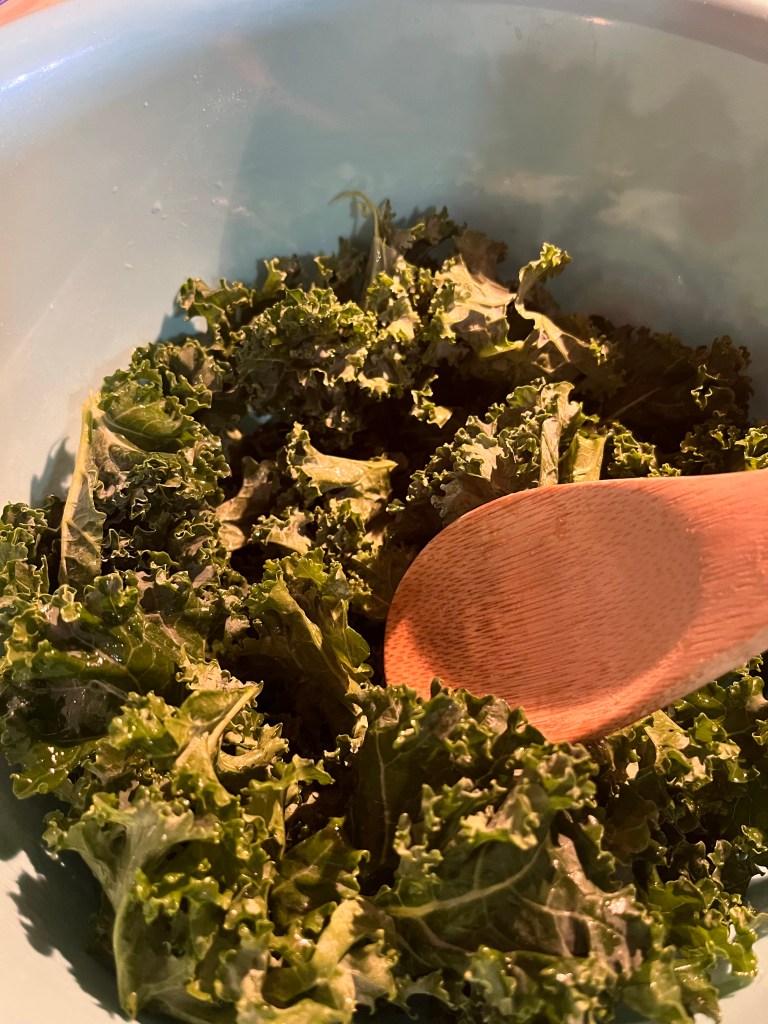
As many know, I am not a very healthy eater. I would rather grab a donut than a handful of kale. So in order to entice me to eat healthier, it’s gotta have some sweet and crunch to it. Oh and throw some cheese in there too!
This Kale and Apple salad is so delicious that I believe I could actually pass on eating that donut (well, maybe not so fast!) but really. It has everything in it that has my tastebuds salivating and makes my heart skip-a-beat. Plus, everything in it is so good for you and the best part…it’s so simple to make.
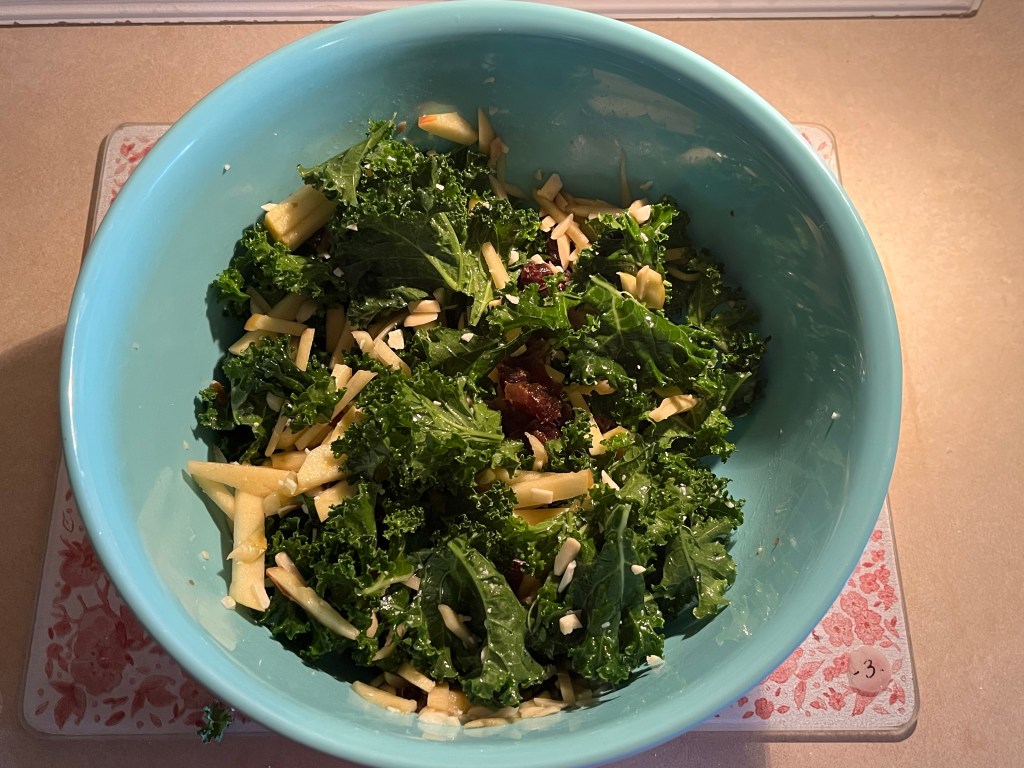
Kale & Apple Salad Recipe
Ingredients
3 TBSP lemon juice
2 TBSP olive oil
Kosher salt
1 bunch kale. Remove the ribs and tear apart the kale into small pieces.
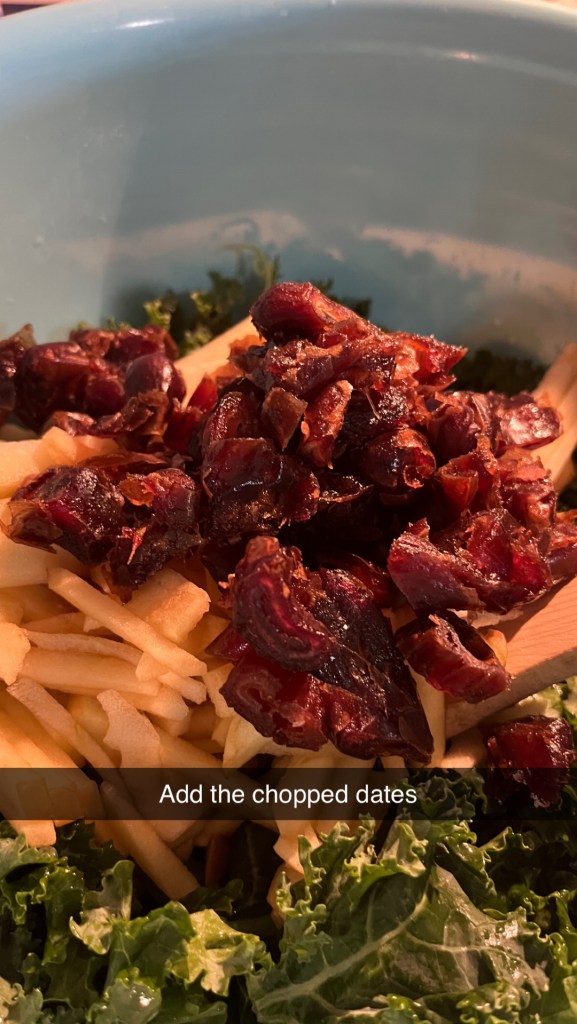
1 cup dates, chopped
2 Honey crisp apples, sliced into thin matchsticks
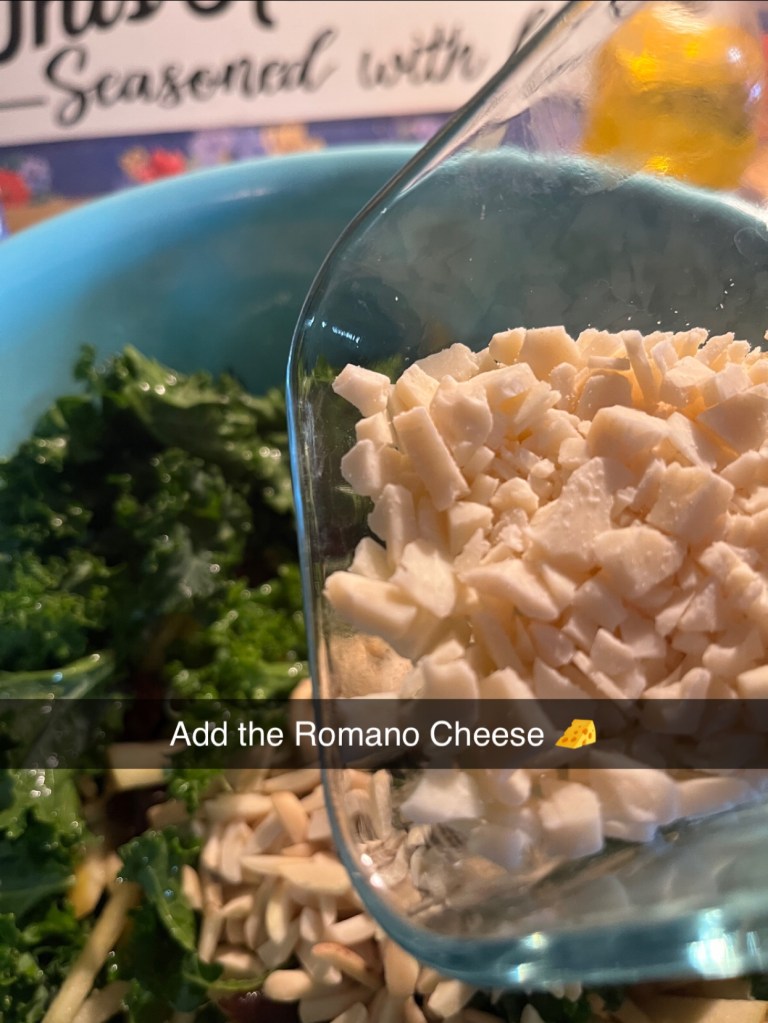
1/2 cup slivered almonds
1/4 cup gated (or chopped into small pieces) Romano cheese. You can really use whatever cheese you prefer – blue cheese sounds delicious too!
Freshly ground black pepper
Directions
Whisk together the lemon juice, olive oil and 1/4 teaspoon salt in a large bowl. Add the kale, toss the salad to coat every piece 🥬Mix all together and enjoy your salad!
So my husband has requested more of ummmm…healthier treats. I’m such a load em’ up with butter, sugar and eat icing from a bowl kinda girl so to try to even wrap my brain around healthy desserts is a foreign concept. But I’ll try! Why not?
So while researching healthy alternatives to my favorite desserts I came across a few tasty ideas. So I figured I would try em’ on my Mr “I’m gonna eat healthy” husband. The first one I tried was Frozen Yogurt Bark – and he loved it! Score points for me 👏 👏
This was so easy to make. You have to try it! And even though it’s yogurt and not the traditional sweet vanilla almond bark? It’s so delicious!!
Directions
Line a cookie sheet with waxed or parchment paper. It’s so important that you do this to make it easier for you to remove the frozen yogurt bark when ready.
Spread out two cups of yogurt evenly onto the cookie sheet. Spread out the fresh fruit and walnuts (or granola).
Put into the freezer for about 4 hours.
Note: Store in the freezer and enjoy a piece whenever you have a sweets craving 👍
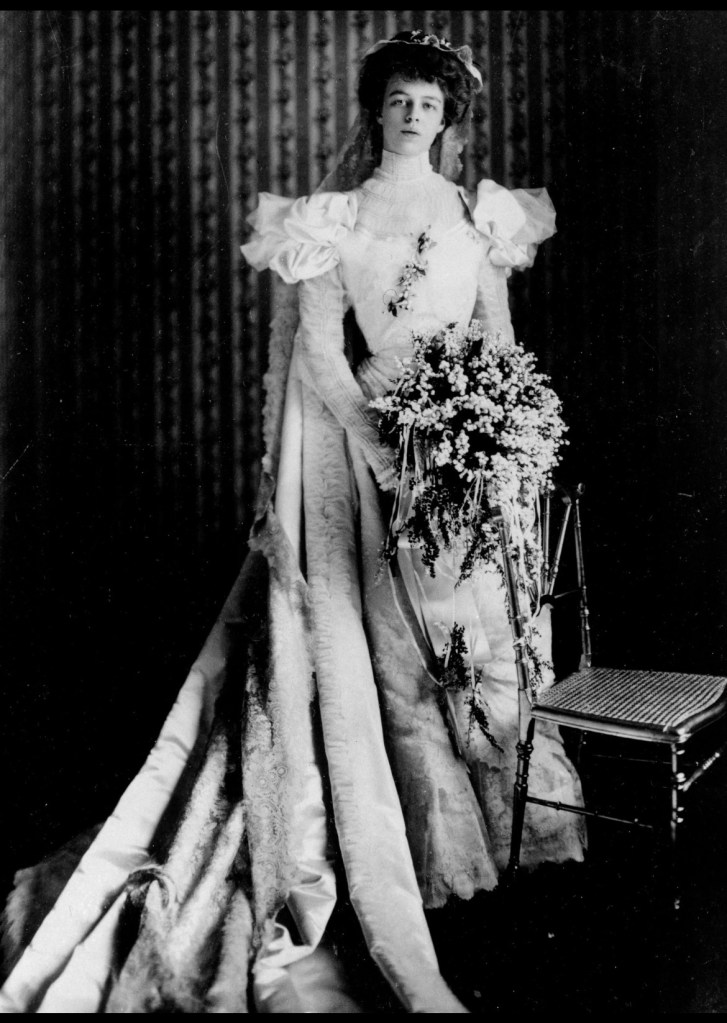
Eleanor Roosevelt on her wedding day. Photo Credit: Associated Press
Today in American history…Franklin and Eleanor Roosevelt were married on March 17, 1905. Eleanor was the niece of President Theodore Roosevelt.
Here is the wedding announcement from the New York Times published on March 18, 1905:
One of the most notable weddings of the year was that celebrated yesterday, when Miss Eleanor Roosevelt, daughter of the only brother of President Roosevelt, and Franklin Delano Roosevelt, a cousin of the President, were married by theRev. Endicott Peabody of Groton, Conn. at the residence of the bride’s cousins, Mr. and Mrs. Henry Parish Jr., 8 East Seventy-sixth Street.
The bride is an orphan, her parents, Mr. and Mrs. Elliott Roosevelt, having died a dozen years or more ago. She has been living with Mrs. Parish since her grandmother, Mrs. Valentine G. Hall, gave up her city home and went to the country to live. President Roosevelt gave the bride away.
The ceremony, which was at 3:30 o’clock, and witnessed only by relatives and a few intimate friends, in reality took place in the house of Mrs. E. Livingston Ludlow, Mrs. Parish’s mother, whose house opens directly into her daughter’s by wide sliding doors. The two large drawing rooms on the second floor, done alike in pale amber-yellow satin brocade, were thrown into one large salon running the width of the two houses.
The bride, walking with the President, and preceded by her six bridesmaids, came down the wide flight of stairs leading from the third floor to the second and across the large foyer hall at the rear of the Parish drawing room, through wide doorways and on to a large mantel at the west side of the Ludlow drawing room, where the ceremony took place. First in the bridal procession came the Misses Alice Roosevelt and Corrine Douglas Robinson, followed by the Misses Ellen Delano and Muriel Delano Robbins, and last the Misses Cutting and Isabella Selmes. The attendants were in white faille silk frocks trimmed with lace and silver, and wore tulle veils attached to white Prince of Wales ostrich feathers, tipped with silver, and carried large bouquets of pink roses.
Following came the bride and the President. The bridal gown was a white satin princess robe, flounced and draped with old point lace, and with a white satin court train. The bride’s point lace veil was caught with orange blossoms and a diamond crescent. She wore a pearl collar, the gift of the bridegroom’s mother, and a diamond bowknot, the gift of Mrs. Warren Delano, Jr. Her bouquet was of lilies of the valley.
The bridal procession passed through an aisle formed by the ushers, who held white satin ribbons. The bridegroom, who came from the large foyer hall of the Ludlow house to the salon to meet the bride, was attended by Lathrop Brown as best man, J. Roosevelt Roosevelt, a half brother, not having arrived from the South in time to fill the place.The ushers were Edmund Rogers, Nicholas Biddle, Lyman Delano, Owen Winston, Charles B. Bradley, W.D. Robbins, and Thomas P. Beales of Boston. A small reception followed the ceremony.
The house was decorated throughout with ferns, palms, and pink roses. The bride’s grandmother, Mrs. V.G. Hall, was in black velvet and point lace. The bridegroom’s mother, Mrs. James Roosevelt, was in white silk, covered with black lace. Mrs. E. Livingston Ludlow was in mauve satin and point lace, and Mrs. Henry Parish wore a changeable pale blue and pink silk crepe, with lace sleeves and yoke.
After the reception the newly wed couple left for a bridal trip of a week only. They are to sail in the late Spring for Europe, where they will spend the Summer. Meanwhile, on their return from their bridal trip, they will occupy an apartment at 40 West Forty-fifth Street.
Among the guests asked to the ceremony, besides those mentioned above were: Mr. and Mrs. Lawrence Waterbury, Mr. and Mrs. E. Livingston Ludlow, Mr. and Mrs. Douglas Robinson, Mrs. Theodore Roosevelt, Mr. and Mrs. Warren Delano, Jr., Mr. and Mrs. Price Collier, Mr. and Mrs. W.E. Roosevelt, Mr. and Mrs. Archibald Rogers, Mrs. Endicott Peabody, Mr. and Mrs. J.E. Roosevelt, Mr. and Mrs. Benjamin Welles, Mr. and Mrs. E.L. Hall, Mr. and Mrs. Eugene Scheffelin, Mrs. W.S. Cowles, Miss Ethel Roosevelt, Mr. and Mrs. F.D. Hitch, Mr. and Mrs. Paul Fiorbes, the Misses Roosevelt, Mr. and Mrs. Thomas Newbold, Miss Blodgett, Mr. and Mrs. A.A. Low, Mr. and Mrs. W.D. Sloanne.
Among the guests invited to the reception were: J. Coleman Drayton, Mr. and Mrs. Winthrop Chandler, Mr. and Mrs. A.D. Russell, Col. Wiliam Jay and Mrs. Jay, Mr. and Mrs. Amos French, Frederick Newbold, Mr. and Mrs. Geraldyn Redmond, the Misses Fish, Mrs. Vanderbilt, Miss Caroline Drayton, Miss Laura Chanler, Mr. and Mrs. Irving Grinnell, Mr. and Mrs. Goodhue Livingston, Lucius Wilmerding, the Misses Newbold, Henry White, Mr. and Mrs. Henry White, Mr. and Mrs. John Henry Hammond, Miss A. Vanderbilt, Mrs. Tilden Selmes, Mr. and Mrs. B. Fulton Cutting.
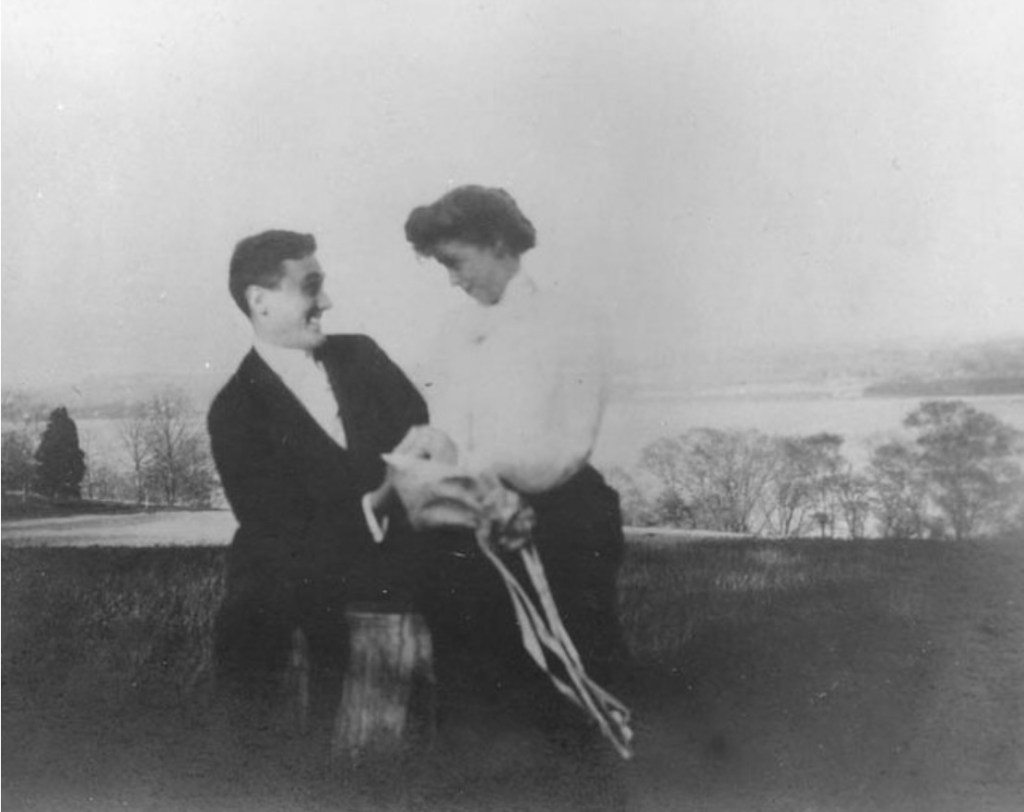
The Roosevelt’s on their honeymoon in Newburgh, N.Y., in May 1905.
Photo Credit: Franklin D. Roosevelt Presidential Library and Museum
After an initial honeymoon of a week at Hyde Park, the Roosevelt’s went on a three-month European honeymoon to Britain, France, Italy and Germany.
Photo Credit: Franklin D. Roosevelt Presidential Library and Museum
On March 17, 1961, President John F. Kennedy accepted shamrocks from the Ambassador of Ireland, Thomas J. Kiernan.
Wishing you a wonderful St Patrick’s Day. Here’s an Old Irish Blessing for you:
“May the Irish hills caress you. May her lakes and rivers bless you. May the luck of the Irish enfold you. May the blessings of St. Patrick behold you.” ☘️
(Photo Credit: Cecil Stoughton. White House Photographer)
Today in American history…our Fourth U.S. President, James Madison, was born on March 16, 1751 at Belle Grove Plantation near Port Conway in what was then known as the Colony of Virginia.
James Madison is revered for being the “Founder of the Constitution” for his historical role in drafting and promoting the U.S Constitution and also the Bill of Rights.
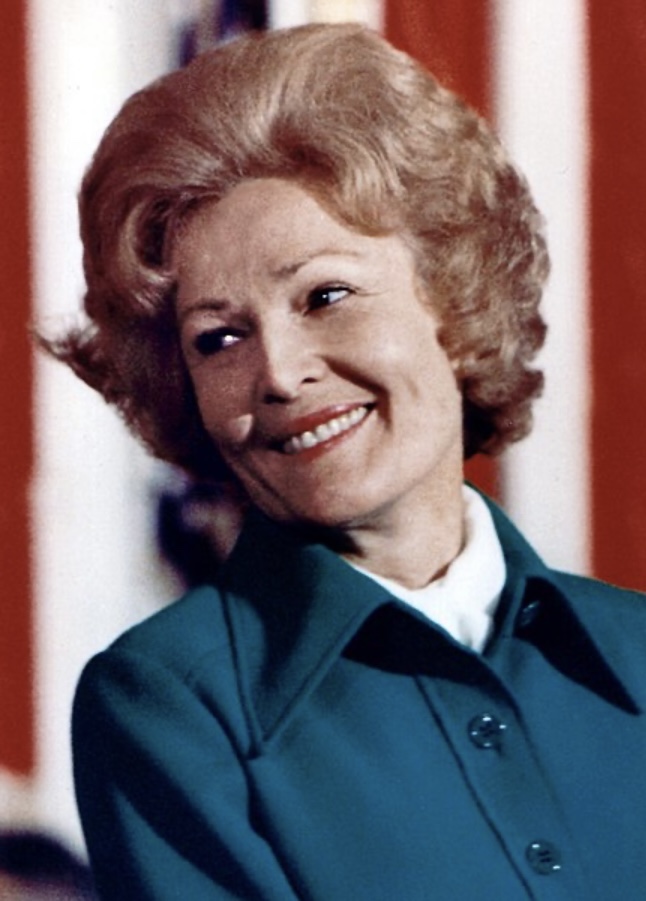
Today in American history…former First Lady Pat Nixon was born on March 16, 1912 in Ely, Nevada. Her birth name was Thelma Catherine Ryan. Since she was born on the eve of Saint Patrick’s Day her father, who was very proud of his Irish heritage, gave her the nickname of “Pat” which is what she would always be known as.
Photo Credit: The Richard Nixon Presidential Library & Musem